Have you ever…
- Scrambled to figure out who still has access to a project months after it ended?
- Spent hours managing permissions manually, only to discover someone still can’t access what they need?
- Worried about the security risks of leaving external users with lingering access to your systems?
- Found yourself paying for licenses that no one is even using?
If any of these sound familiar, you’re not alone. Managing access to tools and data is one of the most common headaches for IT teams, especially in growing. You have employees, partners, and project teams, each needing different levels of access to resources. The more people you have, the harder it becomes to keep track of who has access to what, and manually managing all of this can be time-consuming and prone to mistakes. One of the biggest challenges is ensuring that people only have access for as long as they need it—and no longer.
Take, for example, granting access to temporary workers or external partners. It’s not always easy to know when exactly to grant them access, and it’s easy to forget to revoke it once they’re done. This could open the door to security risks, with sensitive resources being left exposed to people who no longer need them. Even worse, you might be paying for licenses for users who no longer require them, creating unnecessary costs that add up over time. On top of that, ensuring that only the right people have access at the right time, and that the approval process is followed correctly, can feel like an ongoing challenge.
Fear not, I know what you need
This is where Microsoft Entra Access Packages really shine. They allow you to bundle access to apps, teams, and files into one simple package, so users can request access to everything they need in one go. The best part is that you can set policies to decide exactly who can request access, how it should be approved, and when that access should end. By setting up these rules, you can reduce security risks and make sure that users only get access to the resources they truly need, for the time they need it.
With Access Packages, you save time by automating the process of granting and revoking access, while also cutting unnecessary costs by making sure you’re only paying for licenses for active users. This system takes the burden off your shoulders, streamlining the process and ensuring that access is granted responsibly and securely.
So What Is an Access Package?
An access package is a set of permissions that gives users access to apps, groups, or SharePoint files. Instead of giving access manually, users can request the package, and rules (policies) decide:
- Who can ask for access.
- How access is approved.
- When access is given and when it ends.
- What happens when access is no longer needed.
My favorite part is that is both manages access AND improves the security. It’s a win-win for me
How to Create an Access Package with Policies
Access packages in Microsoft Entra let you group access permissions into a single, manageable unit. Follow these steps to create a package that meets the needs of your team or external collaborators:
Step 1: Plan the Package
Before you start, think about what the package needs to include. Decide which resources users will need access to, like apps, groups, or SharePoint sites. Also, think about who will use the package. Are they employees, project team members, or external partners?

Step 2: Create the Access Package
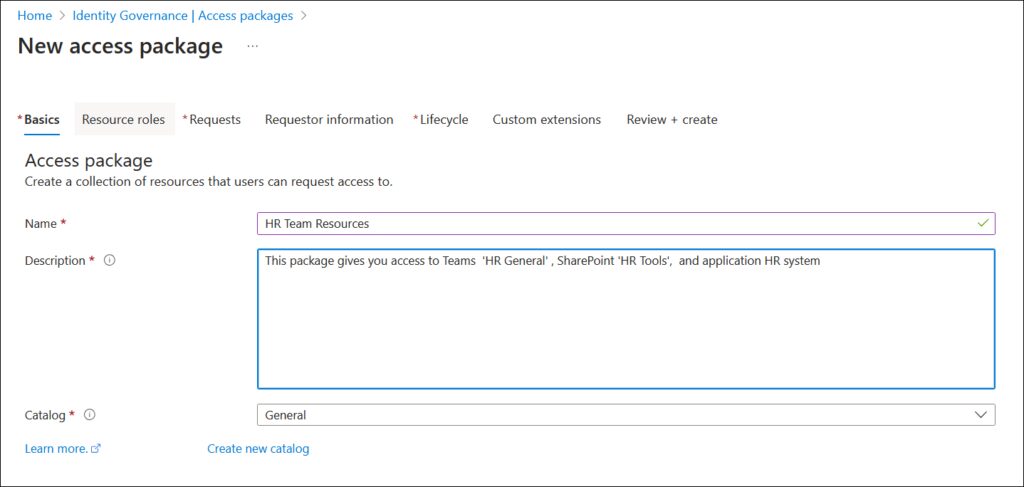
Now you are ready to create the Access Package. Give it a name and description that clearly explain what it’s for. Think about how you would want to see it if you were a user requesting access. For example, you could name it something like “Project X Access” or “HR Team Resources” and add a description like “This package gives you access to Teams, SharePoint, and other tools needed by the HR team.” This will make it easier for both users and IT to understand what’s included and why they’re requesting it.
- Go to the Microsoft Entra admin center.
- Click on Identity Governance, then select Access Packages and choose New Access Package.
- Give your package a name and description that clearly explains what it’s for, so users know why they should request it.
Step 3: Add Resources
Now, it’s time to add the resources to your Access Package. These are the things your users will be able to access when they request the package.
Click + Add resources to select what users will need access to. You can add:

- Groups and Teams: Select the groups or Teams that users will need to be part of for collaboration.
- Applications: Add applications that are connected with Entra ID, such as third-party apps, cloud services like Salesforce or Google Workspace, and enterprise applications used in your organization.
- SharePoint Sites: Include the SharePoint sites that users will need for sharing documents.
- Microsoft Entra Role (Preview): If you need to assign specific roles in Entra, you can add them here.
This step helps you decide exactly what resources your users will be able to access once they request the package.
Step 4: Set Rules (Policies)
Once you’ve decided on the resources to include, it’s time to set policies for the Access Package. Policies control who can request access, how it gets approved, and how long the access lasts. Think of them as rules that help manage and protect your resources.
Here are some examples of policies you might set:
For Internal Teams (No Approval Needed)
By using pre-approved policies for a set of trusted users, access is granted more quickly. These policies also allow you to set a specific timeframe for access, ensuring it is only available when necessary.
- Who can request?: Employees within a specific group.
- Approval needed?: No approval—access is granted automatically.
- Duration: Access lasts for 6 months and can be renewed if needed.
For Projects (Manager Approval)
For project-based access, you can set a policy that grants access only for the project duration and automatically removes it once the project ends. This ensures team members have the necessary access while keeping resources secure and limiting unnecessary access after the project is complete.
- Who can request?: Any employee involved in the project.
- Approval needed?: The employee’s manager must approve the request.
- Duration: Access lasts for the project’s duration and ends when the project is finished.
For External Partners (Extra Approval)
Managing external partners can be tricky. With a two-step approval process and shorter access periods, you can make sure external users only have access when needed and not longer. This keeps things secure.
- Who can request?: External users or guests.
- Approval needed?: First approved by a sponsor, then by an admin.
- Duration: Access ends after 30 days, with no option to renew.
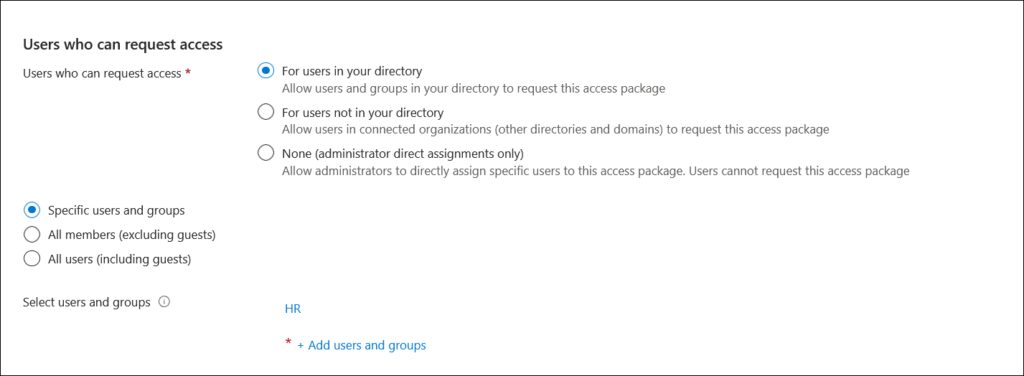
Example: Who
This picture shows how we choose a group of users who can ask for access.
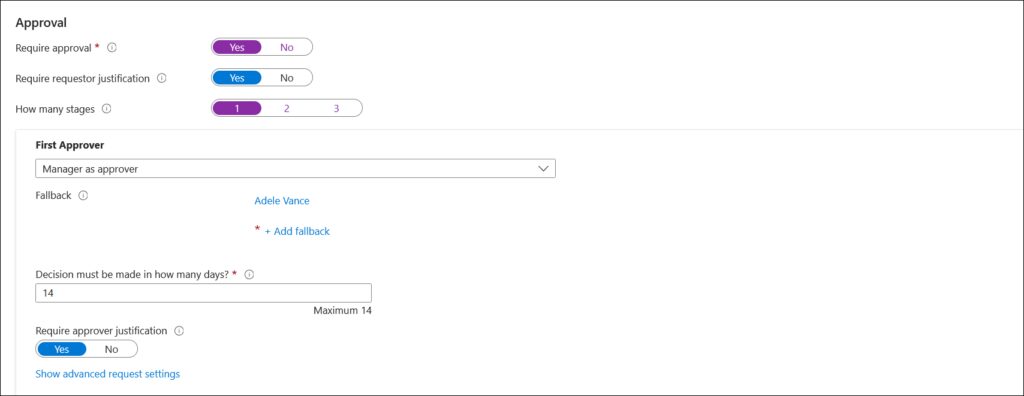
Example: Approver
An option to include multiple approval stages allows you to align the process with your company’s policies, ensuring that the right decision-makers are involved at each step.
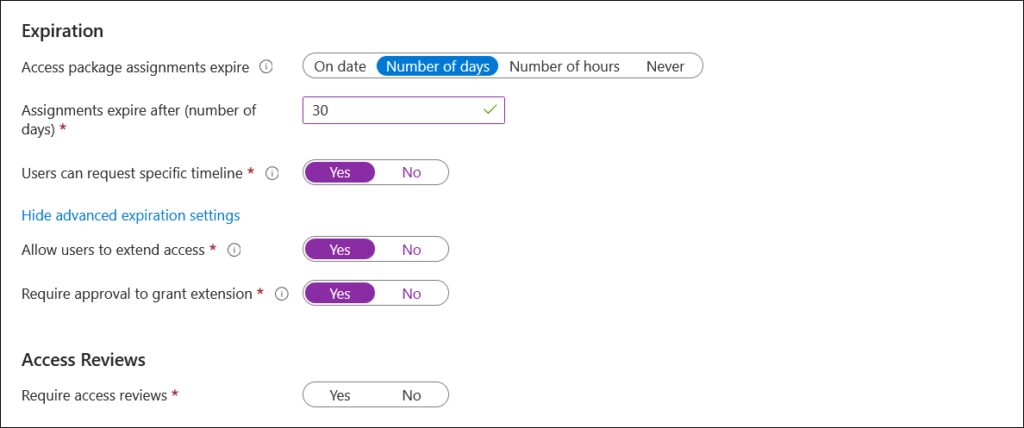
Example: Duration
Make sure access is given only for as long as it’s needed, but keep it flexible by letting users extend access if necessary.
These policies help you manage who can get access and make sure that it’s only granted when necessary. By controlling the approval process and limiting the duration of access, you can ensure security and reduce risks.
Step 5: Save and Test
Once you’ve added all the resources and set the policies, don’t forget to save the Access Package. This makes sure everything you’ve set up is saved and ready to go.
Now, it’s time to test it out. Try making a request yourself or ask someone else to do it. This helps you check if everything works as it should—like how the approval process goes, what resources are granted, and how long the access lasts. Testing is important because it helps catch any faults or issues in the setup that can be fixed before it goes live.
Once you’re happy with how it works and any issues have been addressed, your Access Package is all set to be used!
Step 6: Monitor and Review
Once your Access Package is up and running, it’s really important to monitor how it’s being used. Keep track of who’s requesting access, which resources they’re using, and if everything is working as expected. This helps you spot any issues early on and make sure everything stays on track.
You should also make time for regular reviews. Over time, users may no longer need certain resources or access. For example, you can use Microsoft Entra Access Reivews to check if employees or external partners still require access. If not, you can remove it. Regularly reviewing access is key to ensuring security and keeping your system tidy—only the people who need access will have it.
By staying on top of monitoring and reviews, you can make sure the right people have the right access, keeping everything secure and running smoothly.

Conclusion
Creating and managing Access Packages in Microsoft Entra is an effective way to control who has access to your organization’s resources. By carefully planning the resources you’ll include, setting clear policies for who can request access and how it’s approved, and regularly monitoring and reviewing access, you can ensure a smooth, secure experience for both users and IT.
Testing your setup before rolling it out helps catch any issues, and ongoing reviews help keep everything secure and up to date.
Now make sure you stay tuned (consider subscribing) because there will be more posts with the all-important details for your Access Packages, and you don’t want to miss out!
In the meantime, feel free to check out Per-Torben’s tips on how to manage access when traveling outside the allowed countries here.
Discover more from Agder in the cloud
Subscribe to get the latest posts sent to your email.
