
Why PowerShell is important
For a significant number of us, PowerShell transcends being merely the favored tool for administering various services within Entra ID and M365—it is often indispensable. This necessity arises from the web interface’s limitations, as it fails to expose all available settings and functionalities. Moreover, the web interface lacks the capabilities for task automation, an area where PowerShell shines. Management operations frequently necessitate higher privileges, underscoring the need for enhanced security measures, a topic I have previously addressed in my series of posts on Privileged Identity Management (PIM).
So I will walk you through how to set up and connect PowerShell to these services using an application registration and certificates:
- Microsoft Graph
- Microsoft Teams
- Exchange Online
- SharePoint Online
The challenge with using PowerShell and why certificates help
Connecting through PowerShell to the various services in Microsoft 365 can be quite diverse, and at times, challenging to execute correctly. It’s easy to tell that different departments made the different products and PS-modules 😉 In addition to this, scripts running non-interactively are unable to perform Multi-Factor Authentication (MFA) checks, necessitating an alternative method to secure their access.
My preferred approach is to establish a connection using an Entra ID application registration with a certificate, which offers several advantages.
- Enhanced security: Certificates use cryptographic asymmetrical keys, and they are much harder to compromise than passwords
- Simplified management: Managing certificates can be easier than managing secrets, especially when it comes to rotation and expiration
- Automation: Certificates are well-suited for automation scenarios and the assignment and renewal can also be automated.
An interesting aspect to note is that certificates utilized in application registrations do not require a matching subject-name. Consequently, a single certificate can be applied across multiple applications. This also opens up the possibility of using self-signed certificates as a cost-effective alternative to acquiring public certificates.
Step 1: Obtain a certificate or create a self-signed one
The client computer running PowerShell will have the certificate with the private key installed. The application in Entra ID will have the certificate with the public key. Please note that currently the certificate must use RSA cryptographic algorithm because Entra ID is only compatible with RSA. For additional details, follow the link just below.
If you don’t have a certificate or is not interested in purchasing a public one, you can create a self-signed certificate.
This sample script will create a self-signed certificate and install it on the certificate store of the current logged in user. Then it will export it, without the private key, to the location specified. Here I use the “My documents” folder. You can find more information about creating self-signed certificate for application authentication here (Microsoft Learn).
$Certfolder = $env:USERPROFILE+'\Documents'  # The public Cert will be stored here
$certname = "PowerShell-SelfSigned"    # Replace with your preferred name of the certificate
$cert = New-SelfSignedCertificate -Subject "CN=$certname" -CertStoreLocation "Cert:\CurrentUser\My" -KeyExportPolicy Exportable -KeySpec Signature -KeyLength 2048 -KeyAlgorithm RSA -HashAlgorithm SHA256
Export-Certificate -Cert $cert -FilePath "$Certfolder\$certname.cer"   # Export the public certificate without the private key
If you need to export the certificate with the private key, you can add these 2 lines to the script above:
$mypwd = ConvertTo-SecureString -String "Thi$I$@V3ry$ecureP@$w0rd" -Force -AsPlainText  # Replace with your own password for the cert import
Export-PfxCertificate -Cert $cert -FilePath "$Certfolder\$certname.pfx" -Password $mypwd   # Export the public certificate WITH the private key
Step 2: Install the certificate on the source computer
The certificate should be installed on the computer that will establish a connection to the cloud services via PowerShell. It must be placed in the personal certificate store along with its private key. It is important to note that the computer store will not work, which I learned the hard way. If you have utilized the script provided in step 1, it will automatically install the certificate for the user account that executed the script. However, if you are operating PowerShell under a different user account than the one that generated the certificate, you will need to export the certificate and then import it again as the relevant user, ensuring the private key is included.
Step by step using the GUI:
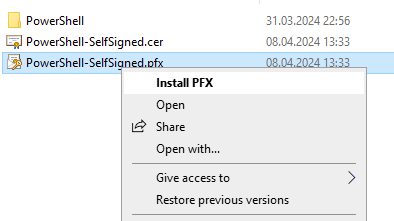
This is step-by-step with a self-signed certificate but the procedure should be similar with public cert. Locate the certificate file with the private key. Its file extension should be .pfx with type “Personal Information Exchange”. You will also need the password which the certificate file is protected with.

Right-click and select “Install PFX”
Make sure “Current user” is selected before you click Next.

File to import should already list your select file, click Next.
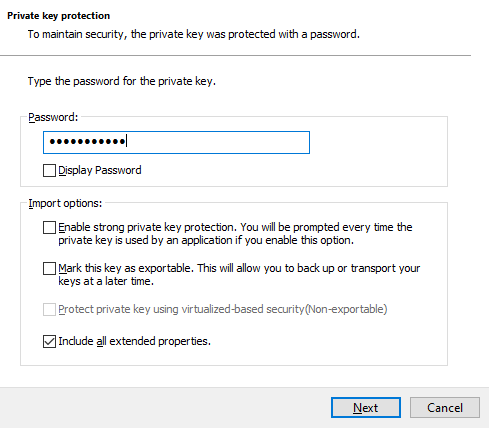
Enter the password for the .pfx file (from the certificate export). Leave the rest as default and click Next.
Under “Certificate store” leave it as default (Automatically select….) and click Next.
Click Finish and it should say “The import was successful“.
Step by step using PowerShell:
To install the cert with its private key using PowerShell use the following code, but make sure PowerShell is run as the correct user account:
$Certfolder = $env:USERPROFILE+'\Documents' # Must point to the location of the .pfx file
$certname = "PowerShell-SelfSigned" # Name of the pfx-certificate (without ".pfx" in the end)
$mypwd = ConvertTo-SecureString -String "Thi$I$@V3ry$ecureP@$w0rd" -Force -AsPlainText #Change to the correct password
Import-PfxCertificate -FilePath "$Certfolder\$certname.pfx" -CertStoreLocation "Cert:\CurrentUser\My" -Password $mypwd
To verify
You can use either GUI or PowerShell to verify the certificate has been installed with its Private key:
Using the GUI:
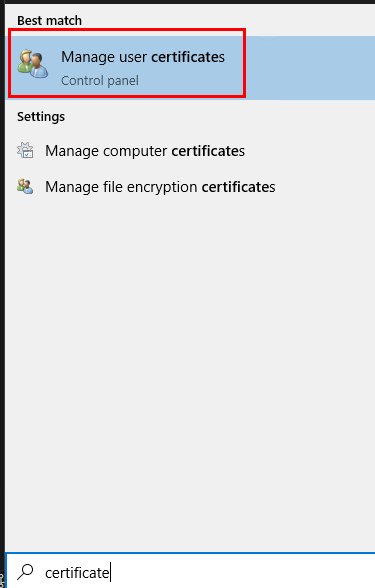
Open the start-menu and search for “Certificate” and it should suggest “Manage user certificate”
In the new window, verify it says “Current user”
Expand “Personal” and then select “Certificates”
You should see your certificate there with a small key on its icon, symbolizing it has the private key installed.

Take note of the Thumbprint as we will need it later.
Using Powershell:
To verify with PowerShell, tun the following cmdlet:
gci Cert:\CurrentUser\My | where Subject -eq "CN=$certname" | select Thumbprint, Subject, HasPrivateKey
it should display the certificate with the thumbprint, subject and state that you have the private key

Take note of the Thumbprint as we will need it later.
Step 3: Configure application registration in Entra ID
Now that we have the certificate with private key installed, the time has come to log into Entra ID and configure an application registration for each service we will connect to using PowerShell. Be aware that the setup is slightly different for each, so I will provide a step-by-step for each of them.
First of all, log in to Entra ID and expand “Identity” –> “Applications” – “App registrations” and select “New registration“. This is the starting point for the following step-by-step guides:
Microsoft Graph
Provide a display name of your choosing and select “Public client/native“. Then click “register” at the bottom.

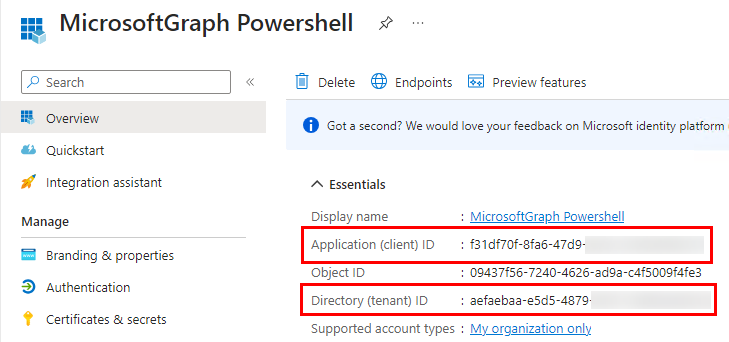
Copy the “Application (client) ID” and “Directory (tenant) ID” to notepad or similar, we will need them later to connect
Next select “Certificates & Secrets“, then “Certificates” and “Upload certificate”
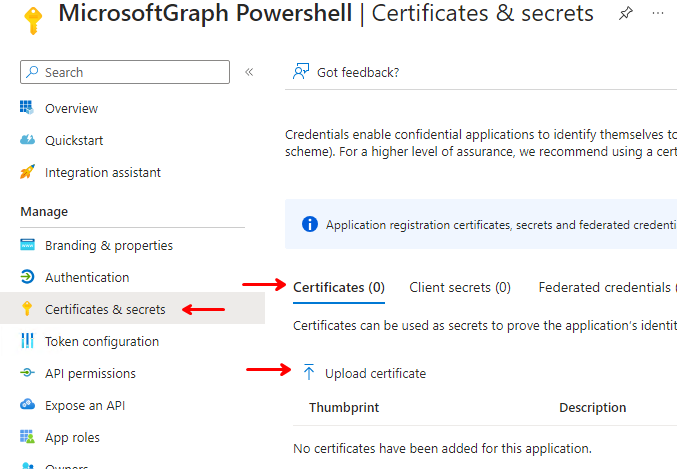
Select the certificate file WITHOUT the private key, usually a .cer file, and write a description for your own purpose, and click “Add” at the bottom.

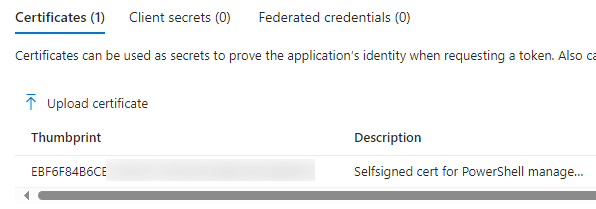
The certificate should appear in the list, and if you haven’t already, take note of the Thumbprint as we need it later to connect.
Next select “API Permissions“, then “Add a permission” and click “Microsoft Graph” on the right side
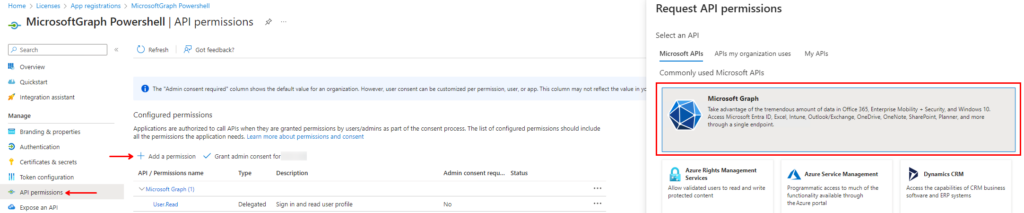
Select “Application permissions” on the next screen.
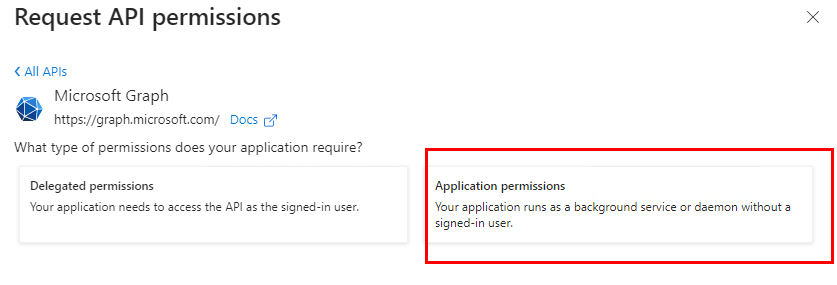
Now you can select which permissions you need to perform the task needed, so what you select next is completely situational. The list is long so I recommend using the search feature. In this demo I will grant it permission to read all Teams and create new ones in the tenant, by selecting “Team.Create” and “Team.ReadBasic.All“. Then click “Add permissions” at the bottom.
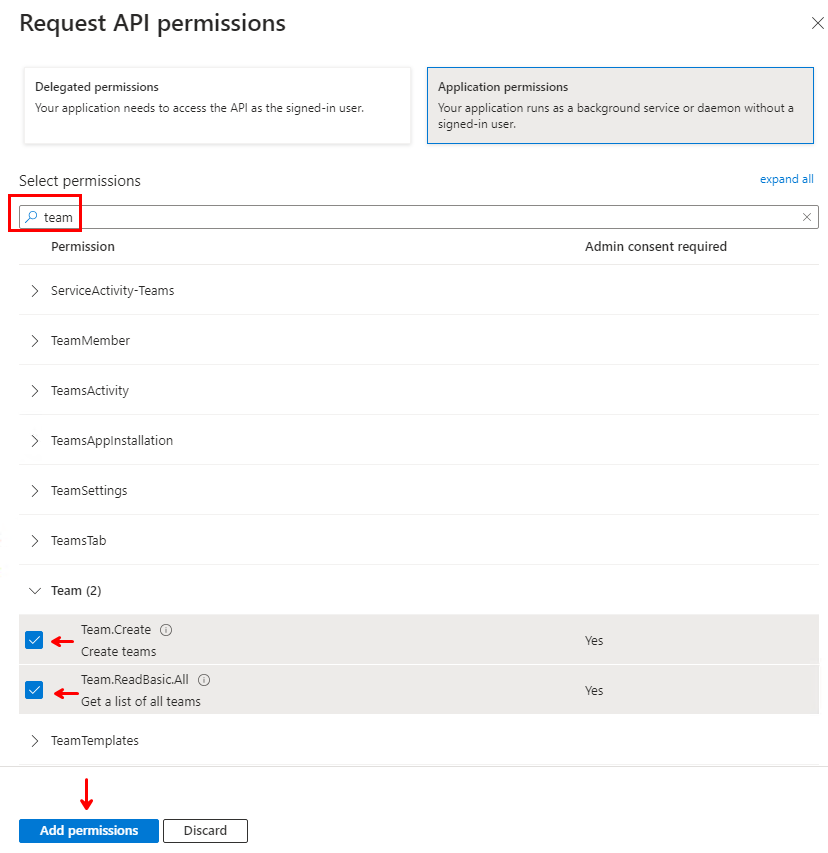
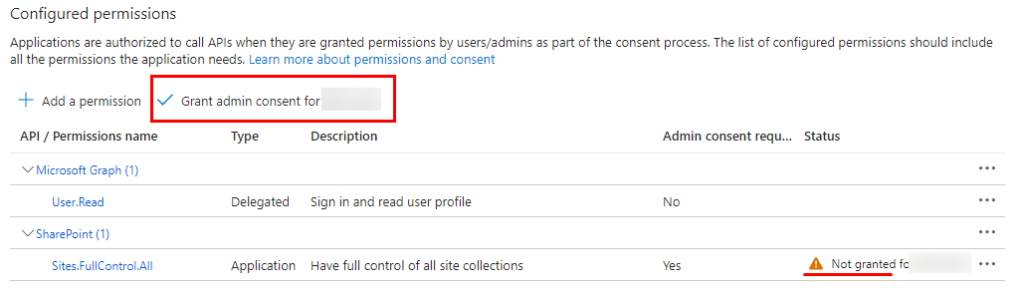
Back on the previous screen, notice that the new permissions has not been granted yet, so you need to select “Grant admin consent….” in the top and select “Yes” before you proceed.

Congratulations! You are now ready to connect to MS Graph PowerShell!
Microsoft Teams
Note that not all cmdlets are supported in application login for Teams. One Example is “New-Team”. Details are here (Microsoft Learn)
To register an app for Teams PowerShell: Follow the same routine as for Microsoft Graph, but with a few differences:
Register an Application: Same procedure as with Microsoft Graph, but take note of the name you give the app. You will need it later
Certificate & Secrets: Same procedure as with Microsoft Graph
API Permissions: Same procedure as with Microsoft Graph, however you will need to assign and grant these permissions under “Request API Permission“:
- Organization.Read.All
- User.Read.All
- Group.ReadWrite.All
- AppCatalog.ReadWrite.All
- TeamSettings.ReadWrite.All
- Channel.Delete.All
- ChannelSettings.ReadWrite.All
- ChannelMember.ReadWrite.All
Additionally: You must navigate to “Roles & admins” –> “Roles & admins” –> Search for and select “Teams administrator”
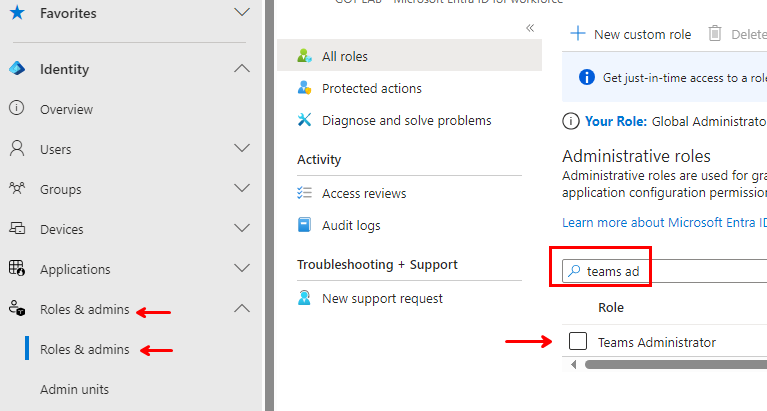
Inside “Teams Administrator” click “Add assignments”

In the new window: Click “No member selected” – Search and locate your app registration, it should have the same name as you entered in the first step. Select it so it is listed on the far right side and then click “Select” in the bottom.

Click “Next” and on the new screen you will likely have to enter a justification. Do so and select “Assign”

Your app is now ready to connect to Microsoft Teams
Exchange Online:
As with Microsoft Teams, there are a few cmdlets which can’t be used with certificate authentication. Details are here (Microsoft Learn)
To register an app for Exchange Online PowerShell: Follow the same routine as for Microsoft Graph, but with a few differences:
Register an Application: Same procedure as with Microsoft Graph, but take note of the name you give the app. You will need it later
Certificate & Secrets: Same procedure as with Microsoft Graph
Manifest: Select “Manifest” on the left side.

Locate “requiredResourceAccess” and replace all the lines there

Insert these lines instead
"requiredResourceAccess": [
{
    "resourceAppId": "00000002-0000-0ff1-ce00-000000000000",
    "resourceAccess": [
        {
            "id": "dc50a0fb-09a3-484d-be87-e023b12c6440",
            "type": "Role"
        }
    ]
}
],
Then click “Save” in the top
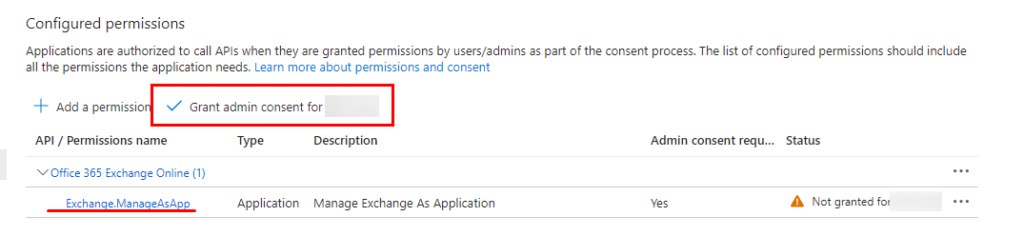
API Permissions: This should now list “Exchange.ManageAsApp“. Grant this permission before you proceed
Roles & admins: Use the same procedure as with Teams, but select “Exchange administrator“role instead of “Teams administrator”
Your app is now ready to connect to Exchange Online.
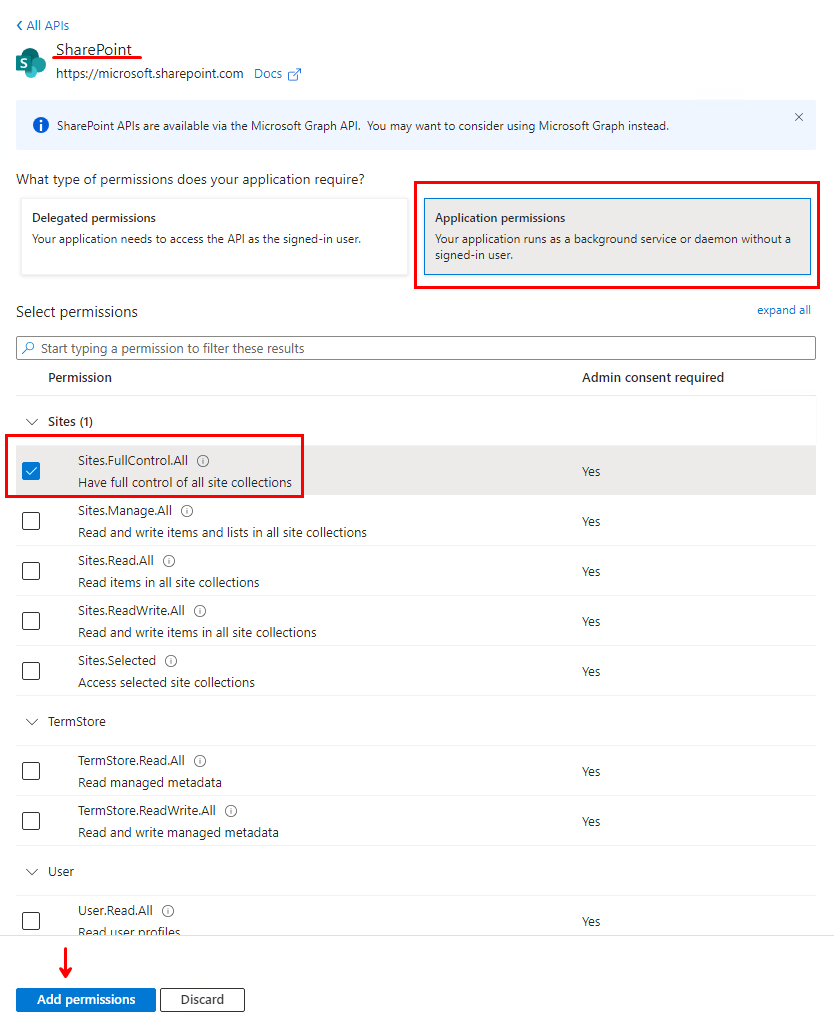
Sharepoint Online
To register an app for Sharepoint Online, I use the pnp.powershell module: Follow the same routine as for Microsoft Graph, but with a few differences:
Register an Application: Same procedure as with Microsoft Graph
Certificate & Secrets: Same procedure as with Microsoft Graph
API Permissions: Same procedure as with Microsoft Graph, however you do not select permissions from Microsoft Graph. Instead you select “SharePoint” in the list.
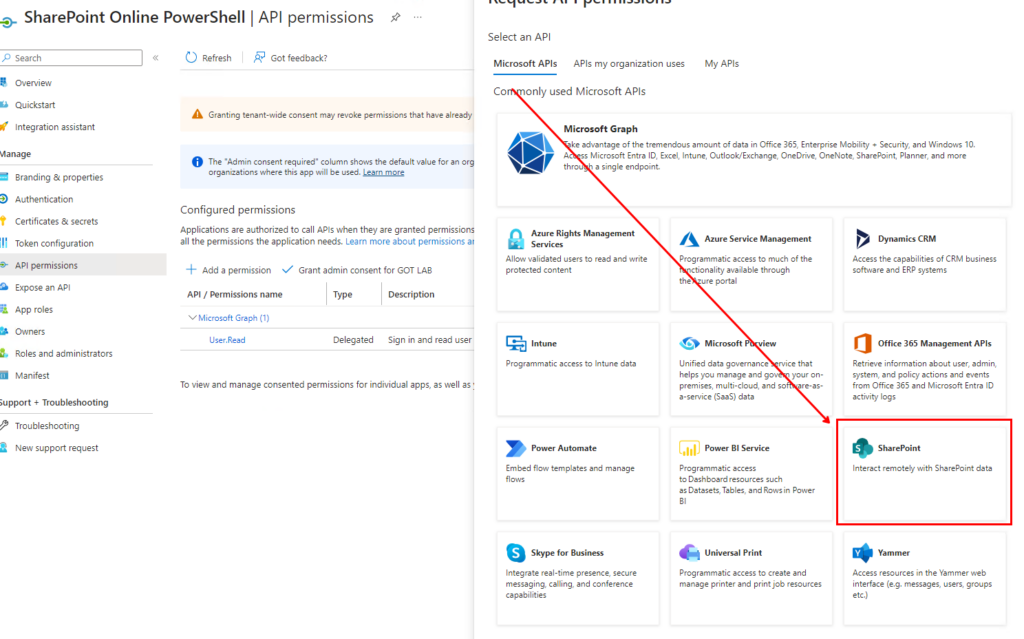
Select “Application permissions” and “Sites.FullControl.All” and then “Add permissions”
Step 4: Connect using PowerShell
And finally we’re here! This is how you connect to various services using PowerShell and certificate-based authentication. Now’s the moment to utilize those tenant IDs, application IDs, and certificate thumbprints you’ve diligently collected during the app registration process. A word of caution: the settings might bear similar yet distinct names, so pay close attention when transferring settings across different hashtables to avoid mix-ups.
# Install-module Microsoft.Graph # Run this if the module is not installed
$GraphConnectionParams = @{
    TenantId = "aefaebaa-e5d5-4879-1111-99999999999"
    ClientId = "f31df70f-8fa6-47d9-2222-abcdabcdabcd"
    CertificateThumbprint = "EBF6F84B6CE18762D17E12345678901234567890"
}
Connect-MgGraph @GraphConnectionParams
Microsoft Teams:
# Install-module MicrosoftTeams # Run this if the module is not installed
$TeamsConnectionParams = @{
    TenantId = 'aefaebaa-e5d5-4879-1111-99999999999'
    ApplicationId = 'aa1e7b7d-f8fc-4b58-3333-bcdabcdabcda'
    CertificateThumbprint = 'ebf6f84b6ce18762d17e12345678901234567890'
}
Connect-MicrosoftTeams @TeamsConnectionParams
Exchange Online:
Note that with Exchange Online you can’t use the tenant id to connect. You are required to utilize the pre-configured “fallback domain,” such as “domain.onmicrosoft.com.”
# Install-module ExchangeOnlineManagement # Run this if the module is not installed
$ExchangeConnectionParams = @{
    Organization = 'XYZXYZ.onmicrosoft.com'
    AppId = '467ca8aa-c6d2-47ba-4444-cdabcdabcdab'
    CertificateThumbPrint = 'ebf6f84b6ce18762d17e12345678901234567890'
}
Connect-ExchangeOnline @ExchangeconnectionParams
Sharepoint Online:
When establishing a connection to SharePoint Online, specifying a URL is necessary, and this URL varies based on the target site. Consequently, I find it more practical to maintain the URL separately from the “ConnectionParams” hashtable.
# Install-module PnP.PowerShell # Run this if the module is not installed
$SpoConnectionParams = @{
    Tenant = 'aefaebaa-e5d5-4879-1111-99999999999'
    ClientId = 'e75a34a5-a119-4b17-5555-dabcdabcdabc'
    Thumbprint = 'ebf6f84b6ce18762d17e12345678901234567890'
}
$AdminSiteURL = 'https://Tenantname-admin.sharepoint.com/'

Connect-PnPOnline -Url $AdminSiteURL @SpoConnectionParams
And there you go. You should now be able to connect easily and securely with PowerShell using certificates as authentication. Thank you so much for reading this post, I truly hope you found this useful and I wish you all the best mastering PowerShell as your management tool,
Until next time, keep scripting and may the force of automation be with you!
Discover more from Agder in the cloud
Subscribe to get the latest posts to your email.