
Welcome back to my last posts in this series about Entra ID PIM!
- In part 1, I explained what PIM is and how it works
- In part 2, I walked through a proof-of-concept setup with Entra ID roles assigned to groups.
- In part 3, I talked about using CoPilot with PIM could yield some scary results and the activation procedure
So now I will finish with a few tips to help you get more value from your PIM implementation.
Logging – It’s right there! Kinda….
Logging is not only crucial for monitoring the PIM activities, but can also be important in meeting any compliance demands you may have. However, I think the logging for PIM is a bit clunky, and this is why:
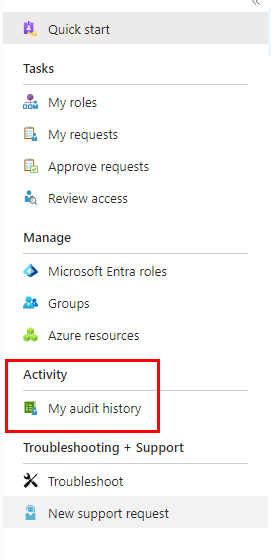
In the admin portal, where you usually activate your role, you only have the option to see your own activity. So for an admin, this does not give any information about any other users besides him/herself.
Compare this with a regular sign-in log for a user in your tenant. You simply navigate to “Users “- “All users” and then you can either select “Sign-on logs” to see the log for all users or you click on a user and you can see the sign-in log for that user only. Why not something similar for PIM?
You can however go to Entra ID – Identity – Monitoring & health – Audit Logs and you will find PIM as a separate Service to filter on if you want only PIM-related log entries. Here you can see all changes in the configuration and activation regarding PIM. I know it’s perhaps a nitpick, but in my mind it would make more sense to place this in the PIM portal, at least for users with privileges to read the logs.
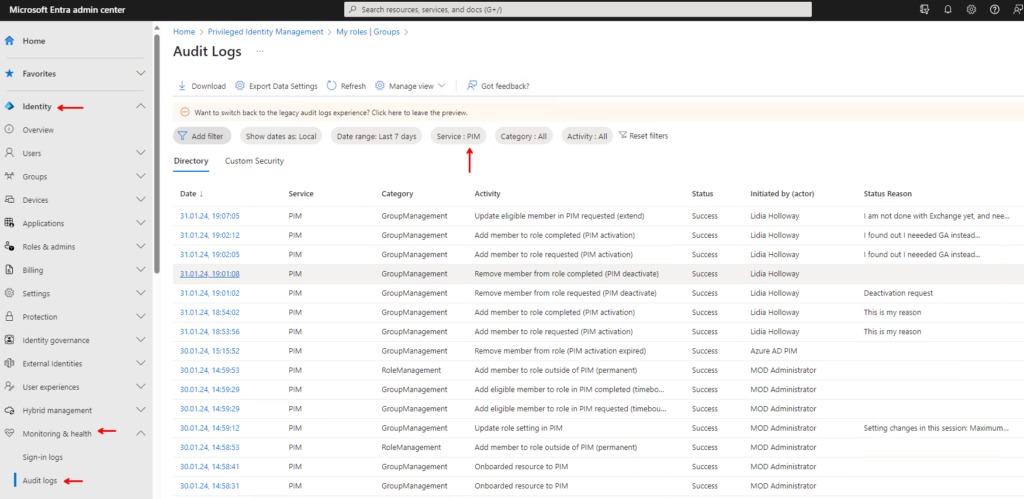
You can also navigate to “All users” – “Audit logs” and click the banner to get to the new audit log preview, which will bring you to the same place as above.

And as always PowerShell comes to the rescue! You can extract the same information using the “Get-MgAuditLogDirectoryAudit” cmdlet. A simple script so show the concept would look like this:
Connect-MgGraph -Scopes "AuditLog.Read.All"
$pimlogs = Get-MgAuditLogDirectoryAudit -Filter "loggedByService eq 'PIM'"
Write-Host '$pimlogs contains the output of the script.' -ForegroundColor Yellow
Take security to the next level
When PIM is used to protect the most privileged roles, you should absolutely consider boosting the security of these activations. Here “Authentication context” comes into play and it’s shockingly easy to implement. Here’s an example:
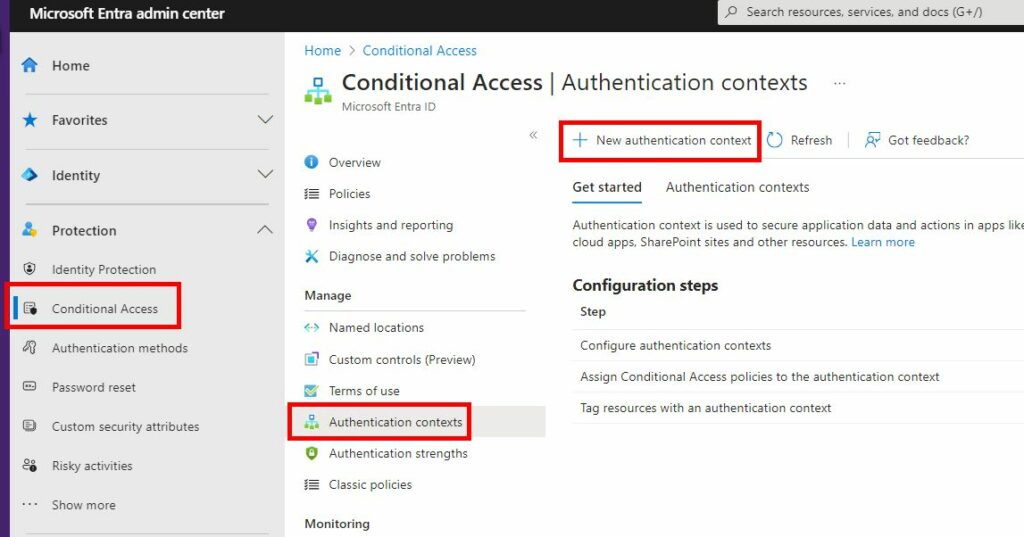
In Entra ID, navigate to “Protection“, “Conditional Access” select “Authentication context” and “New Authentication context”
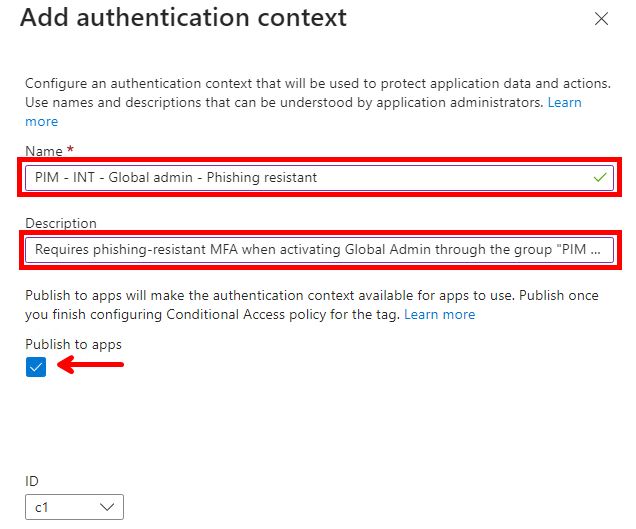
In the new window on the right side, give it a proper name and description, and make sure “Publish to apps” is selected. Then click “Save” in the bottom
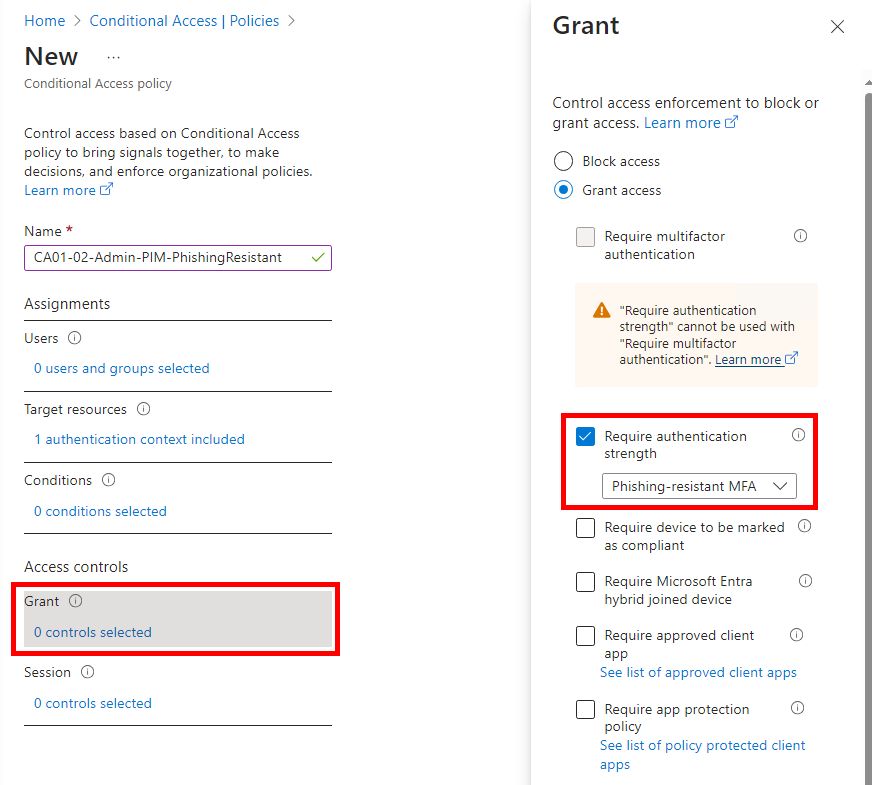
Create a new Conditional Access Policy, “Target resources” must target the new Authentication Context and then set whatever requirement you want for it. In this case I’ve selected to require the pre-defined setting of Phishing-resistant MFA Method.
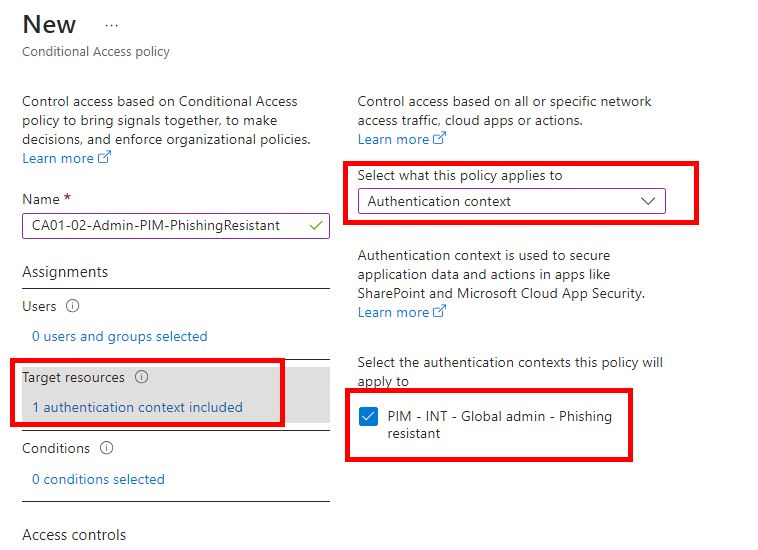
And last: Go to the corresponding PIM group and select the Authentication Context there.
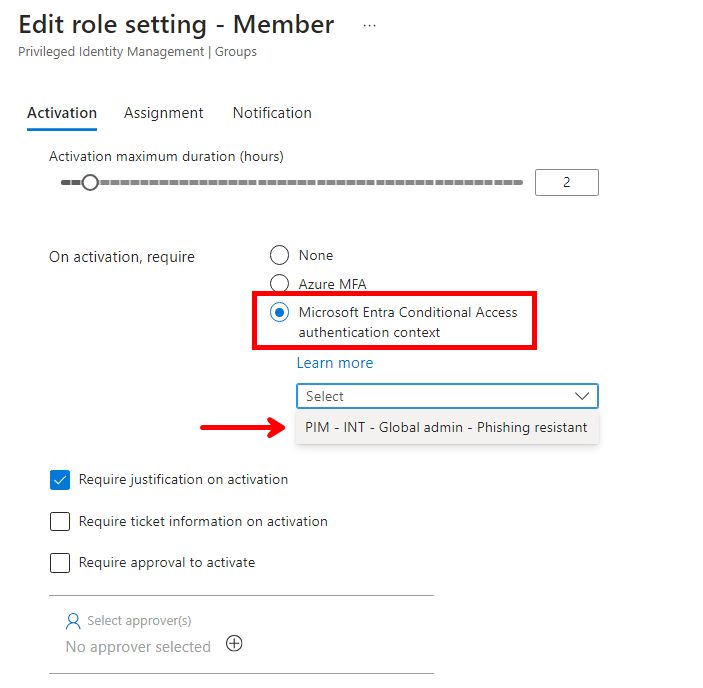
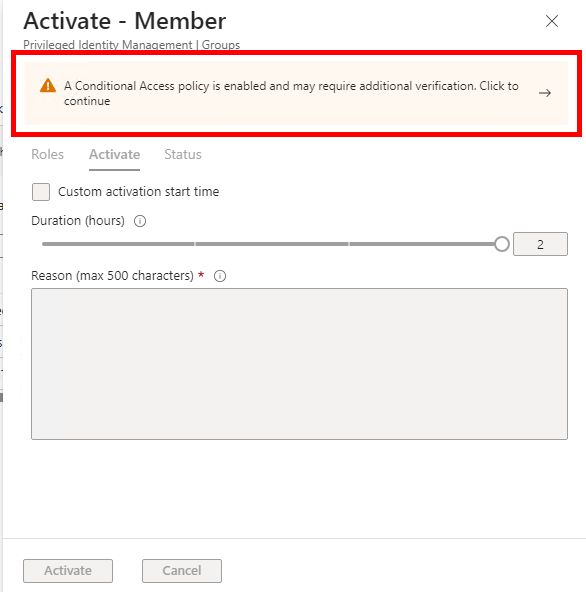
Now, whenever someone elevates membership into this group, it will trigger the Authentication Context which is linked to the new Conditional Access policy, which again requires a phishing resistant MFA method. The user needs to complete this additional verification before the membership is assigned.
But I need to know exactly who can elevate into a PIM group!!
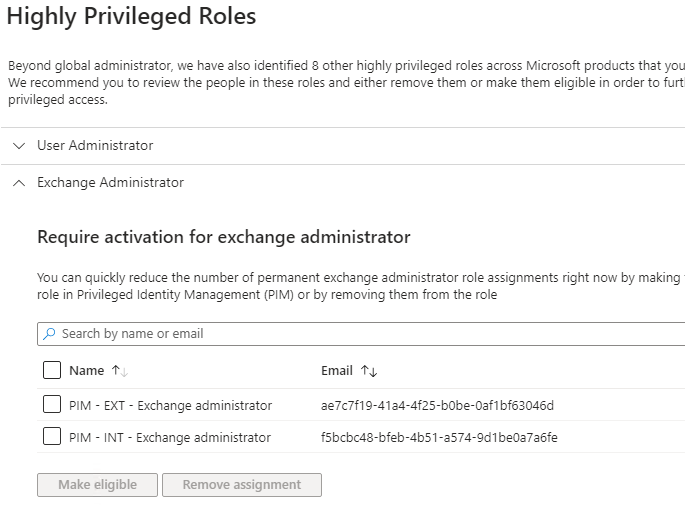
Another obstacle here is that it is hard to tell who is eligible to elevate through PIM (another reason to do access reviews regularly). The portal has a nice option “Discovery and insights (Preview)” but this is only available on delegation of PIM-roles but not delegation of PIM-groups. And when you use groups, you can see the groups assigned a privileged role, but you can not see who’s eligible to activate membership in them. On the screenshot below you see the two groups assigned the Exchange Administrator role, but you can’t see who’s eligible to become a member of them, so this isn’t very informative.
So PowerShell comes to the rescue once more🥳! I must admit that this was tricky one to solve, so huge shoutout to my friend and colleague Elias Jansen (You rock, seriously!) who made this script for me. The script can be run without any modification.
# No changes needed, can be run as-is
#region Get accesstoken
$ClientID = '1950a258-227b-4e31-a9cf-717495945fc2'
$TenantID = 'common'
$Resource = "01fc33a7-78ba-4d2f-a4b7-768e336e890e"
$DeviceCodeRequestParams = @{
Method = 'POST'
Uri = "https://login.microsoftonline.com/$TenantID/oauth2/devicecode"
Body = @{
client_id = $ClientId
resource = $Resource
}
}
$DeviceCodeRequest = Invoke-RestMethod @DeviceCodeRequestParams
Write-Host $DeviceCodeRequest.message -ForegroundColor Yellow
pause
$TokenRequestParams = @{
Method = 'POST'
Uri = "https://login.microsoftonline.com/$TenantId/oauth2/token"
Body = @{
grant_type = "urn:ietf:params:oauth:grant-type:device_code"
code = $DeviceCodeRequest.device_code
client_id = $ClientId
}
}
$TokenRequest = Invoke-RestMethod @TokenRequestParams
$token = "Bearer {0}" -f $TokenRequest.access_token # Oauth token from the azure portal
#endregion
#region Get PIM groups
$pimgroups = Invoke-RestMethod -Method Get -Uri "https://api.azrbac.mspim.azure.com/api/v2/privilegedAccess/aadGroups/resources?$select=id,displayName,type,externalId&$expand=parent&$top=10" -Headers @{Authorization = "$token"} #-ContentType "application/json"
$assignments = @()
$n = $pimgroups.value.Count
for($i=0;$i -lt $n;$i++){
$grpassignment = Invoke-RestMethod -Method Get -Uri "https://api.azrbac.mspim.azure.com/api/v2/privilegedAccess/aadGroups/roleAssignments?`$expand=linkedEligibleRoleAssignment,subject,roleDefinition(`$expand=resource)&`$filter=(roleDefinition/resource/id%20eq%20%27$($pimgroups.value[$i].id)%27)" -Headers @{Authorization = "$token"} #-ContentType "application/json, text/javascript, */*; q=0.01"
$assignments += $grpassignment.value
}
#endregion
#region Collect group eligibility and store in $export
$export = @()
$groupedassignments = $assignments| Group-Object -Property {$_.roleDefinition.resource.displayName}
$n = $groupedassignments.Count
for($i=0;$i -lt $n;$i++){
$output = [PSCustomObject]@{
Name = $($groupedassignments[$i].name)
User = $($groupedassignments[$i].Group.subject.displayName)
Email = $($groupedassignments[$i].Group.subject.email)
memberType = $($groupedassignments[$i].Group.MemberType)
assignmentState = $($groupedassignments[$i].Group.assignmentState)
status = $($groupedassignments[$i].Group.status)
}
$export += $output
}
clear-host
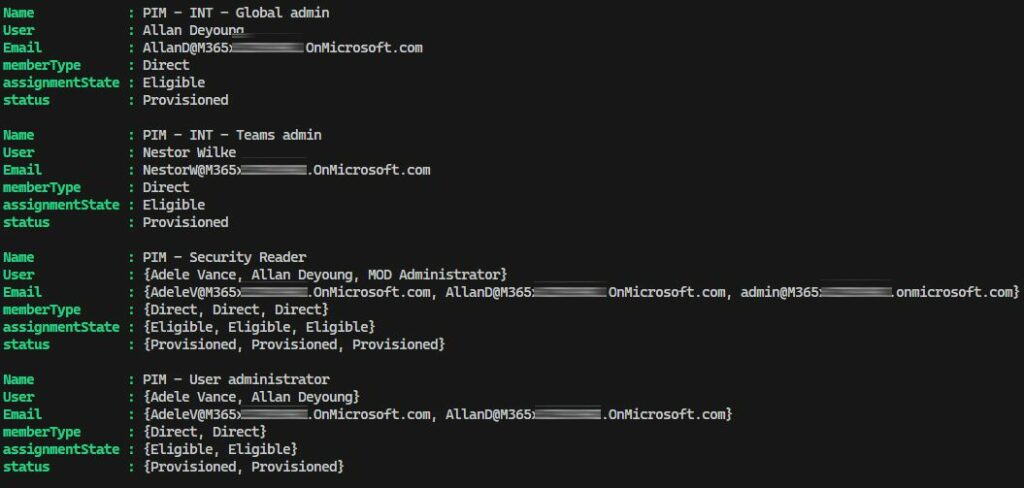
Write-Host '$export contains the output of the script.' -ForegroundColor Yellow
#endregion
Here the variable $export contains all the groups with elevated privileges assigned and list users eligible to join the group with their name and email address and if their status is eligible or active (assigned).
So this concludes my series about Entra ID, Privileged Identity Management. I hope you found this useful, and any feedback is welcome of course.
Take care and I’ll see you in the next post.
Author

Discover more from Agder in the cloud
Subscribe to get the latest posts sent to your email.