
The Problem with Guest Users
Let’s be real: Guest accounts often start with the best intentions. We invite external collaborators, grant them access to resources, and things seem to go smoothly. Here’s the catch: if we’re not careful, those guest accounts can quickly turn into a security headache.
As time goes on, many guest accounts are never cleaned up once they’re no longer needed. The result? A growing mess of outdated accounts with permissions that no longer make sense. And as external collaboration continues to ramp up, it becomes harder to tell who has access to what, and why they still have it.
It doesn’t have to be this way. Imagine being able to collect key details from your guest users right at the point of sign-up, giving you the power to tailor their access, target them with the right policies, and keep your security in check from the start. Not only does this streamline the onboarding process, but it also ensures you’re always in control of who gets access to what.
The Challenge: Guest Users and Missing Attributes
When a guest is invited, they often come with just the basics, like a display name, their UserPrincipalName, and an email address. While that’s enough to get them in the door, it’s far from ideal when it comes to maintaining proper governance. Without additional details, enforcing key policies like dynamic groups, lifecycle workflows, or Conditional Access becomes a real challenge.
And if you’re collaborating with multiple partner organizations, here’s where things get tricky. You don’t want to give every guest the same level of access. But without the right metadata, you lose the ability to tailor their permissions. It’s like trying to organize a party without a guest list, chaotic and risky.
The Solution: Self-Service Guest Sign-Up with Governance Controls
In this post, I’ll guide you through setting up a seamless self-service sign-up process for guest users with Entra ID Governance. This isn’t just about making onboarding easier, it’s about collecting the right details upfront so you can automate governance, enforce policies, and even provision access to external applications. By doing this, you’re bringing guest user management into alignment with how you handle your internal users, making everything smoother, more secure, and easier to control.
Guest Onboarding with Self-Service Sign-Up in Entra ID Governance
With Microsoft Entra ID Governance, you can transform your guest onboarding process by letting external users enter their own details during sign-up. This not only cuts down on the administrative workload but also ensures you gather the right information from the start, creating a solid foundation for secure, policy-driven access.
While there are other ways to manage guest information, this method stands out as one of the easy-to-manage solutions.
Licensing Requirements
To enable self-service sign-up, you’ll need Entra Entitlement Management, available through Entra ID P2. For advanced governance features—including automated workflows and custom attributes—you’ll require the Entra ID Governance license.
The best part? Guest users don’t need a license. Microsoft follows a 1:5 ratio, meaning one licensed internal user covers up to five guest users.
For large organizations with more than 50,000 monthly active guests, Microsoft applies a MAU (Monthly Active User) licensing model. Read more about licensing here.
Testing or piloting? You can start with just one Entra ID Governance license for proof-of-concept. Microsoft also offers “step-up” subscriptions from Entra ID P2.
Implementation Guide
1. Enable Guest Self-Service Sign-Up
- Go to Microsoft Entra Admin Center
- Navigate to: External Identities > External Collaboration Settings
- Enable Guest Self-Service Sign-Up via User Flows
2. Create a Microsoft 365 Group
You can use other resources, but to keep this simple let’s create a security group.
- Give the group a name and description
- Set Membership type to Assigned
3. Set Up an Access Package
- Go to: Identity Governance > Entitlement Management > Catalogs
- Create a new catalog and enable it for external users
- Add an Access Package, give it a clear name, and description
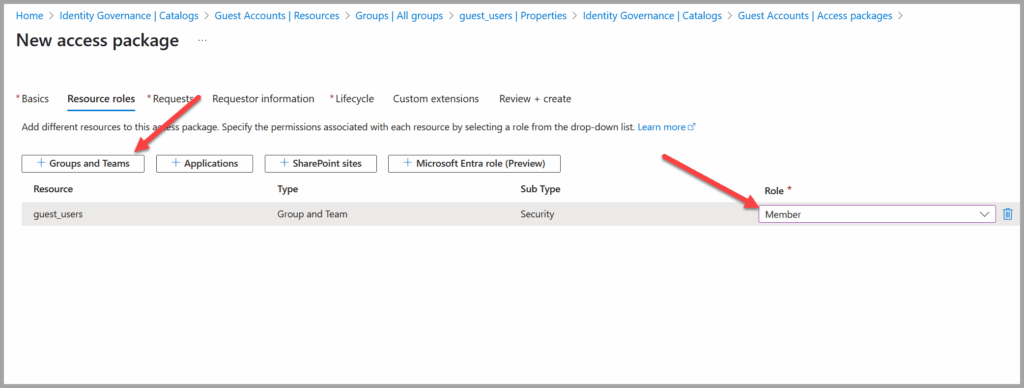
- In Resource Roles add:
- The group you created and set role to Member
- Under Request Settings, choose:
- For users not in your directory:
- Set this to All users (connected organizations + new external users).
Note: While it’s best practice to limit access to known (managed) organizations, using this broader setting simplifies the process.
- Set this to All users (connected organizations + new external users).
- Approval:Since we’re dealing with external users, approval is required.
- Select Approvers:
Choose at least two approvers, so there’s a backup if the primary approver is unavailable.
- Select Approvers:
- Lifecycle: Expiration might differ based on users, but for this purpose, lets just add a never expire
- Access package Assignment expire : Never
- User can request specific timeline: No
- Access Review: No
- Review and Create: Review your settings and hit create
4. Collect Guest Attributes
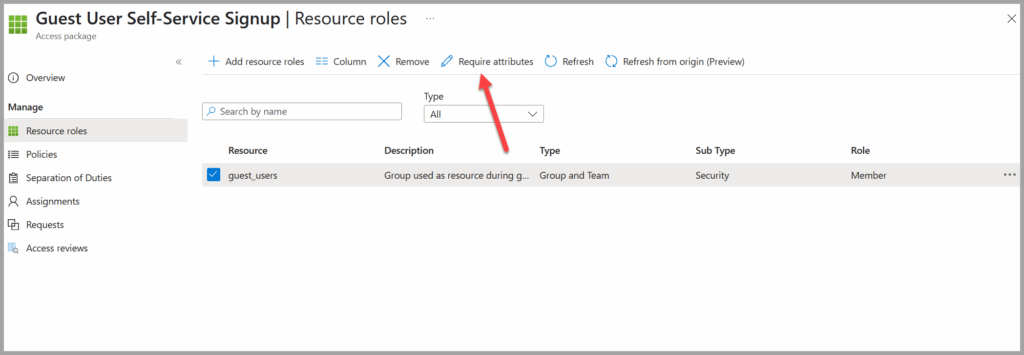
- Go back to the Security Group Resource in the Catalog
- Select Require Attributes
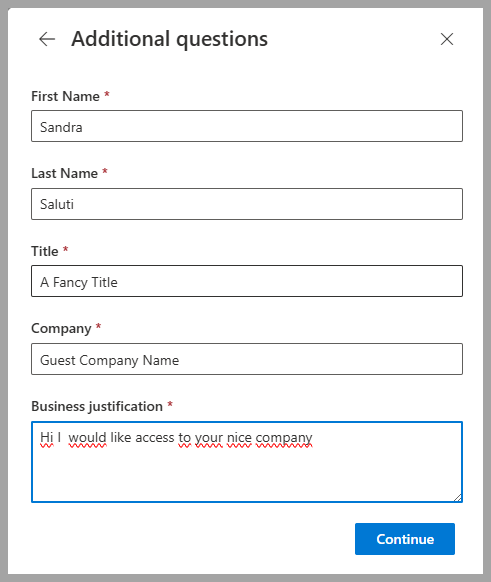
- Decide which attributes you want to collect in my example I want to fetch:
- Decide which attributes to collect.
- In this example, the following attributes will be fetched:
- First Name
- Last Name
- Job Title
- Company Name
- In this example, the following attributes will be fetched:
- Decide which attributes to collect.
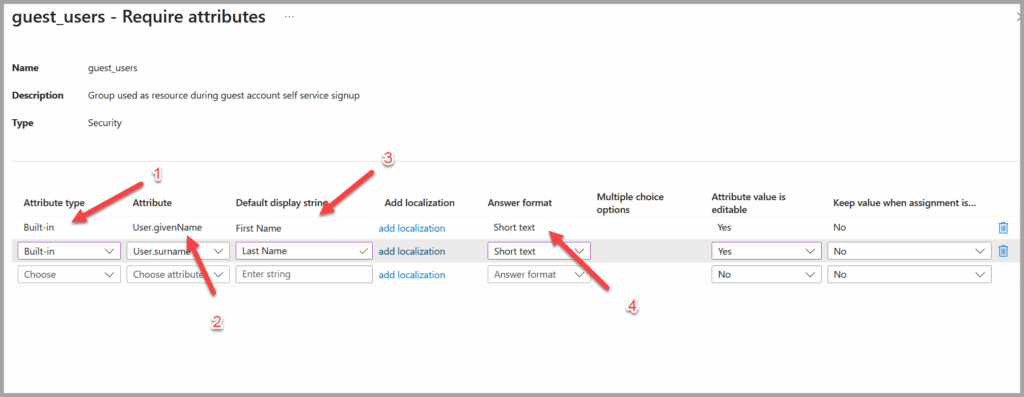
- Configure Attribute mapping:
- Attribute Type:
- Set to Built-in, since all the required values are standard attributes available in Entra ID.
- Attribute:
- Choose from the list of available attributes in the Entra ID user schema (e.g., User.givenName, User.surName, User.jobTitle, User.companyName).
- Default Display String:
- This is the message or label shown to the guest when they are asked to provide the value (e.g., “job title”).
- Answer Format:
- Set to Short Text for all fields, as the expected input is simple text.
- Attribute Type:
These attributes can be used to:
- Enrich guest profiles
- Target dynamic groups
- Automate provisioning to third-party systems
Depending on your scenario, you might also want to collect other attributes to target your guest.
- Department
- Country
- Manager
- Access Purpose
5. Share the Sign-Up URL
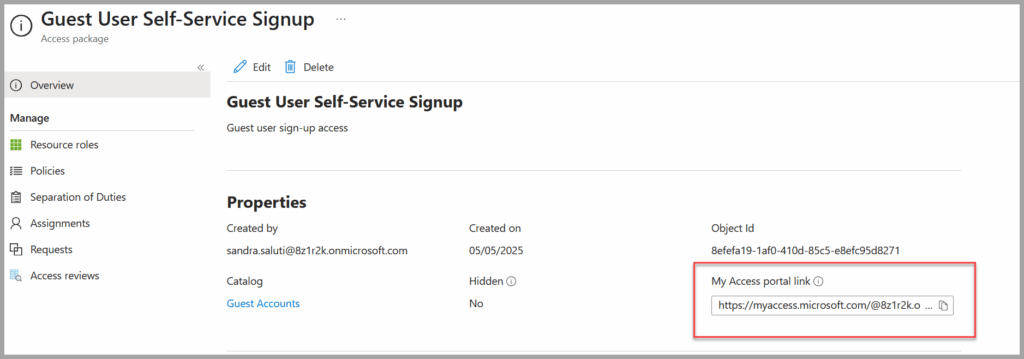
Once your access package is fully configured, copy the generated sign-up URL and share it with your external users or partners.
You can find the sign-up URL in the Overview section of the access package you created.
The Guest Onboarding Experience
Here’s how the flow works from a guest user’s perspective:
- They click the URL, register with Multi-Factor Authentication
- They view package details and fill out the sign-up form
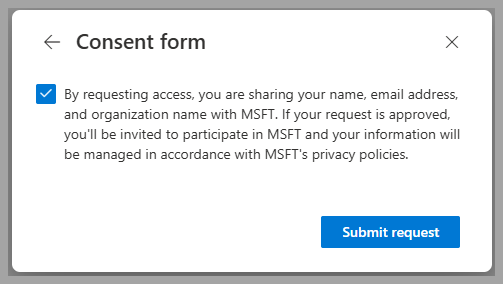
- They review and consent to requested permissions
- The designated approver receives a notification and reviews the request
- Once approved, the guest is added to Entra ID with the specified attributes
Automate, Secure, and Govern
With your guest accounts enriched and standardized, you can now:
- Apply Dynamic Group Memberships
- Trigger Lifecycle Workflows (e.g., for offboarding or access reviews)
- Automate SCIM provisioning to third-party apps
- Maintain zero trust and governance policies across hybrid environments
The benefits of this setup ensures a balance between ease of collaboration and rigorous access control, giving you confidence in how guests are managed across your organization.
Automate and Govern Guest Users
With guest users now enriched with the necessary attributes, you can:
- Apply dynamic group policies
- Use Lifecycle Workflows for automated access reviews
- Automate provisioning to third-party applications with SCIM integration
- and more.
This setup ensures guest users are onboarded with all necessary details while maintaining security and governance compliance.
Conclusion
Guest access doesn’t have to be chaotic. With Entra ID Governance and self-service sign-up, you can collect the right details right from the beginning, automate approval processes, and enforce governance policies effortlessly. It’s an easy way to stay secure, ensure compliance, and save your team valuable time.
In my next post, I’ll dive into offboarding scenarios, exploring how to ensure your guest accounts are properly managed even after their collaboration ends. Stay tuned to learn how to streamline offboarding and keep your access controls secure and efficient.
Author

Discover more from Agder in the cloud
Subscribe to get the latest posts sent to your email.