
As I was reading my colleague’s blog post about creating an Automation Account for managing Exchange Online, I was reminded that Microsoft recently announced a Graph extension to Bicep, their infrastructure-as-code tool (announcement here). This extension is currently in preview, and at the time of writing, supports the following limited set of resources exposed through the Microsoft Graph API:
- Applications
- App role assignments
- Federated identity credentials
- Groups
- OAuth2 permission grants (delegated permission grants)
- Service principals
This list is as I mentioned above, rather limited, but will probably expand as more work is done on the extension. For an updated list of supported resources, see Microsoft Learn.
After reading a bit, I thought it would be interesting to see if I could recreate my colleague’s PowerShell work with Bicep. The rest of this blog post is a walkthrough of my work to get this to work.
Spoiler: as of publishing, this is not possible to do with Bicep, only Terraform. We’ll have to wait until the Graph extension is updated to support Directory Roles before this is possible ⏳ However, I will describe the work that I have done up to this point, and possibly add to this blog post when the extension is updated.
Initial setup and configuration
I will leave the installation of Bicep (and later Terraform) as an exercise for the reader. Microsoft has published guidance on how to do this here, and it should be fairly straightforward to follow. If you have Bicep installed already, make sure you are on at least version v0.29.45, as the Graph extension requires some additional functionality not present in earlier versions of Bicep.
As for permissions, you’ll need the following:
- Permission to create a Resource Group on a Subscription, such as Contributor
- Permission to assign and grant consent on Microsoft Graph Application permissions and to assign Directory Roles in Entra ID. The role Privileged Role Administrator should be sufficient
Next, create a folder to hold your IaC code. Alternatively, you can clone my code and follow along from there:
git clone https://github.com/abaddon82/bootstrap-exchangeautomation.git
cd bootstrap-exchangeautomation
cd bicep
Configuring Bicep to use extensions
In order to enable extensions in Bicep, you’ll have to add some configuration to it. Bicep uses a file called bicepconfig.json to change its configuration. To enable extensions, create this file in your newly created directory, and add the following to it:
{
    "experimentalFeaturesEnabled": {
        "extensibility": true
    },
    "extensions": {
        "microsoftgraph": "br:mcr.microsoft.com/bicep/extensions/microsoftgraph/v1.0:0.1.8-preview",
        "microsoftgraphbeta": "br:mcr.microsoft.com/bicep/extensions/microsoftgraph/beta:0.1.8-preview"
    }
}
Extensions is an experimental feature, which is why the experimentalFeaturesEnabled block needs to be added. This opens up the extensions block, where we declare our extensions in key/value pairs. The keys (“microsoftgraph”, “microsoftgraphbeta”) are friendly names used to refer to the extension in the actual Bicep files, and the values (“br:mcr.microsoft.com/bicep…”) are URI’s referring to a Bicep Registry module. These modules can be found in the Microsoft Artifact Registry.
Important: if you see or own code that’s only using the experimentalFeaturesEnabled part, paired with a provider microsoftGraph directive in the actual .bicep file, that code is using built-in types and should be migrated to dynamic types by January 24th next year.
To learn more about this file, check out Microsoft Learn.
Defining resources
Next create a file called main.bicep. This will be our entrypoint into building the resources we need.
First, declare which extensions we’ll use. Notice that this refers to the friendly name from our bicepconfig.json:
extension microsoftgraph
We’ll also declare some parameters in order to increase the reuse value of our module, instead of hardcoding the values directly:
@description('Azure region where the Resource Group and Automation Account is to be placed')
param location string

@description('Name of the Resource Group that will be created and contain the Automation Account')
param resourceGroupName string

@description('Name of Automation Account')
param aaName string
By default, Bicep tries to deploy to a Resource Group. Since we’re deploying our own Resource Group, we’ll need to change the deployment scope to subscription:
targetScope = 'subscription'
Next, we’ll declare some variables that references well known GUID’s for first-party Microsoft resources:
// Exchange Online app ID
var exchangeOnlineAppId                   = '00000002-0000-0ff1-ce00-000000000000'

// Microsoft Graph app ID
var msGraphAppId                          = '00000003-0000-0000-c000-000000000000'

// Microsoft Graph Organization.Read.All application permission
var msGraphOrgReadAllAppRoleId = '498476ce-e0fe-48b0-b801-37ba7e2685c6'

// Exchange Online Exchange.ManageAsApp application permission
var exchangeOnlineAdministratorAppRoleId  = 'dc50a0fb-09a3-484d-be87-e023b12c6440'
The app ID’s are the same across all of Microsoft’s tenants. However, we’ll need to reference the unique Service Principal ID’s present in our own tenant. We therefore declare these resources in our code so that we can reference them later (notice the existing keyword), and get the unique values. Here we use the Bicep Graph extension type Microsoft.Graph/servicePrincipals:
resource exo_sp 'Microsoft.Graph/servicePrincipals@v1.0' existing = {
  appId: exchangeOnlineAppId
}

resource msgraph_sp 'Microsoft.Graph/servicePrincipals@v1.0' existing = {
  appId: msGraphAppId
}
Now, let’s create a Resource Group to hold our Automation Account. Nothing special here, just declaring it using properties from our previously supplied parameters:
resource rg_automation 'Microsoft.Resources/resourceGroups@2024-06-01-preview' = {
  name: resourceGroupName
  location: location
}
For readability, and in order to be able to change the deployment scope, the Automation Account configuration has been split into its own Bicep module file (don’t worry, we’ll go through this module shortly). Below, we call that module with our parameters. Notice how we change the deployment scope to our newly created Resource Group:
module aa_exchange 'modules/modAutomationAccount.bicep' = {
  scope: rg_automation
  name: 'aa_exchange'
  params: {
    aaName: aaName
    location: location
  }
}
Next, create a folder called modules, and create a new file within called modAutomationAccount.bicep. This is our Bicep code file for creating the Automation Account.
First, let’s declare our parameters. Some of the parameters have defaults set, in order to simplify its use:
@description('Azure region where the Automation Account is to be placed')
param location string

@description('Name of Automation Account')
param aaName string

@description('SKU level of Automation Account')
@allowed(['Basic', 'Free'])
param aaSku string = 'Free'

@description('Version of the Exchange Online Management module to use')
param exModuleVersion string = '3.6.0'

@description('Version of the Microsoft.Graph module to use')
param msGraphModuleVersion string = '2.24.0'
Next, we’ll declare a variable that points to a PowerShell script hosted on GitHub. This is a script for testing the Automation Account, slightly modified from my colleague’s version:
var testScriptUrl = 'https://raw.githubusercontent.com/abaddon82/bootstrap-exchangeautomation/refs/heads/main/runbooks/Test-ExchangeConnectivity.ps1'
The script looks like this:
$ErrorActionPreference = 'Stop'

try {

    Write-Output "Connecting to Microsoft Graph"
    $MGConnectionResult = Connect-MgGraph -ManagedIdentity -NoWelcome

    Write-Output "Retrieving initial tenant domain"
    $InitialDomain = Get-MgDomain | Where-Object { $_.IsInitial -eq $True } | Select-Object -ExpandProperty Id

    Write-Output "Connecting to Exchange Online"
    $ExchangeConnectionResult = Connect-ExchangeOnline -ManagedIdentity -Organization $InitialDomain

    Write-Output "Running Exchange cmdlet for testing"
    $AcceptedDomains = Get-AcceptedDomain

    Write-Output "Everything works! You can now create new runbooks or replace this one to do your Exchange management tasks."

} catch {
    Write-Error $_
}
It first connects to the Microsoft Graph API in order to retrieve the domain we need to use for connecting to Exchange Online. After we’ve successfully connected to Exchange Online, we run a test command to check that everything works. Notice how both the connection to Microsoft Graph and Exchange Online is done through the use of a Managed Identity.
Next we’ll create the actual Automation Account. We declare some basic properties on it, such as SKU, networking, and most importantly for this blog post, identity type, which is set to “SystemAssigned”. This enables the System Assigned Managed Identity on the Automation Account, so that it can use it to represent itself to other resources and applications (see script above):
resource aa_exchange 'Microsoft.Automation/automationAccounts@2023-11-01' = {
  name: aaName
  location: location
  identity: {
    type: 'SystemAssigned'
  }
  properties: {
    sku: {
      name: aaSku
    }
    publicNetworkAccess: true
  }
}
Next, we’ll declare a Runbook. This is where our test script will live:
resource runbook_exchange 'Microsoft.Automation/automationAccounts/runbooks@2023-11-01' = {
  parent: aa_exchange
  location: location
  name: 'Exchange Test Runbook'
  properties: {
    runbookType: 'PowerShell'
    publishContentLink: {
      uri: testScriptUrl
    }
    logProgress: false
    logVerbose: false
  }
}
The script in the Runbook uses some custom PowerShell modules that aren’t available in the Automation Account by default. We therefore have to declare them so that they get imported correctly. Below, we declare that we wish to import the Exchange Online Management module, and three Microsoft Graph modules:
resource aa_exchangemgmt_module 'Microsoft.Automation/automationAccounts/modules@2023-11-01' = {
  parent: aa_exchange
  location: location
  name: 'ExchangeOnlineManagement'
  properties: {
    contentLink: {
      uri: 'https://www.powershellgallery.com/api/v2/package/ExchangeOnlineManagement/${exModuleVersion}'
    }
  }
}

resource aa_msgraph_module 'Microsoft.Automation/automationAccounts/modules@2023-11-01' = {
  parent: aa_exchange
  name: 'Microsoft.Graph'
  properties: {
    contentLink: {
      uri: 'https://www.powershellgallery.com/api/v2/package/Microsoft.Graph/${msGraphModuleVersion}'
    }
  }
}

resource aa_msgraphauth_module 'Microsoft.Automation/automationAccounts/modules@2023-11-01' = {
  parent: aa_exchange
  name: 'Microsoft.Graph.Authentication'
  properties: {
    contentLink: {
      uri: 'https://www.powershellgallery.com/api/v2/package/Microsoft.Graph.Authentication/${msGraphModuleVersion}'
    }
  }
}

resource aa_msgraphdirman_module 'Microsoft.Automation/automationAccounts/modules@2023-11-01' = {
  parent: aa_exchange
  name: 'Microsoft.Graph.Identity.DirectoryManagement'
  properties: {
    contentLink: {
      uri: 'https://www.powershellgallery.com/api/v2/package/Microsoft.Graph.Identity.DirectoryManagement/${msGraphModuleVersion}'
    }
  }
}
Our Automation Account is now configured correctly. The final step we’re doing in this module, is to return a value from it that is going to be used in our main.bicep file:
output aa_exchange_sami string = aa_exchange.identity.principalId
This is the ID of the Managed Identity configured on the Automation Account. We’ll need this to assign permissions to the Automation Account in Entra ID.
Save the file, and go back to our main.bicep file.
In our main.bicep file, we can now use the SAMI ID to assign Microsoft Entra permissions. Below, we assign two application permissions: Exchange.ManageAsApp to the Exchange Online application, and Organization.Read.All to the Microsoft Graph application. This is also done by our Bicep Graph extension:
resource aa_ara_exoadmin 'Microsoft.Graph/appRoleAssignedTo@v1.0' = {
  appRoleId: exchangeOnlineAdministratorAppRoleId
  principalId: aa_exchange.outputs.aa_exchange_sami
  resourceId: exo_sp.id
}

resource aa_ara_orgreader 'Microsoft.Graph/appRoleAssignedTo@v1.0' = {
  appRoleId: msGraphOrgReadAllAppRoleId
  principalId: aa_exchange.outputs.aa_exchange_sami
  resourceId: msgraph_sp.id
}
As you can see, we are using the SAMI ID from our Automation Account module to assign the correct permissions.
Let’s try to run this deployment. First, connect to Azure. You’ll need the Az PowerShell module or the Azure CLI tools for this. For this Bicep deployment I’ll use the PowerShell module:
Connect-AzAccount -AccountId bitwise@agderinthe.cloud
Next, select the Subscription where you want to deploy the Resource Group and Automation Account:
Select-AzSubscription blog-post-testing-dev
The deployment needs to specify some parameters for the Bicep code. This can be done in many different ways, but for brevity’s sake, I’ll just use a hash table:
$BicepParameters = @{ 'location' = 'norwayeast'; 'resourceGroupName' = 'rg-exchange-automation'; 'aaName' = 'aa-exchange-automation' }
Finally, start a new deployment using our Bicep code:
New-AzDeployment -TemplateFile .\main.bicep -Name 'test-deployment-aa' -TemplateParameterObject $BicepParameters -Location 'norwayeast'
Wait a little while while the Azure Resource Manager churns through our template, and you should get something similar to this:
Id                      : /subscriptions/deadbeef-c0de-acab-cafe-0faceb00cbad/providers/Microsoft.Resources/deployments/test-deployment-aa
DeploymentName          : test-deployment-aa
Location                : norwayeast
ProvisioningState       : Succeeded
Timestamp               : 11.10.2024 13:37:00
Mode                    : Incremental
TemplateLink            :
Parameters              :
                          Name                 Type                       Value
                          ===================  =========================  ==========
                          location             String                     "norwayeast"
                          resourceGroupName    String                     "rg-exchange-automation"
                          aaName               String                     "aa-exchange-automation"

Outputs                 :
DeploymentDebugLogLevel :
The Automation Account has now been created successfully! Let’s test it:
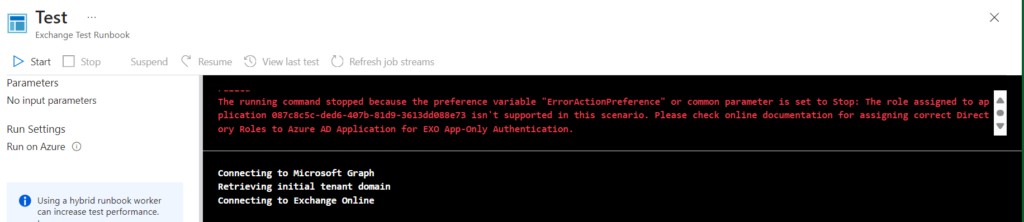
The error message says “The role assigned to application 087c8c5c-ded6-407b-81d9-3613dd088e73 isn’t supported in this scenario. Please check online documentation for assigning correct Directory Roles to Azure AD Application for EXO App-Only Authentication.”
After some quick and dirty Googling, it seems that the Enterprise Application associated with the Managed Identity needs an Entra ID Directory Role as well. This is currently not supported by the Graph Bicep extension. It seems we’ll have to wait for an update to the extension for this to work. At least I got to try the new Bicep extension functionality 😎
Let’s try something else
I still thought being able to build something like this in a flash using IaC was a good idea, so I implemented the exact same functionality (that also adds the Directory Role) in Terraform. I will not go through the Terraform code in this blog post, as it has already grown large enough, but here is a rundown on how to use it:
Clone the bootstrap-exchangeautomation repository (this is the same repo as we’ve worked with through this blog post):
git clone https://github.com/abaddon82/bootstrap-exchangeautomation.git
Enter the folder for the Terraform part of the repo:
cd tf
Login to Azure (using Azure CLI this time) and initialize Terraform:
az login --tenant agderinthe.cloud
terraform init
Start the deployment. Add the Subscription ID to the command line to specifiy where to deploy the resources:
terraform apply -var="subscription_id=feedbeef-acab-ea15-ab1e-deafcafebabe"
Let’s try the test again:
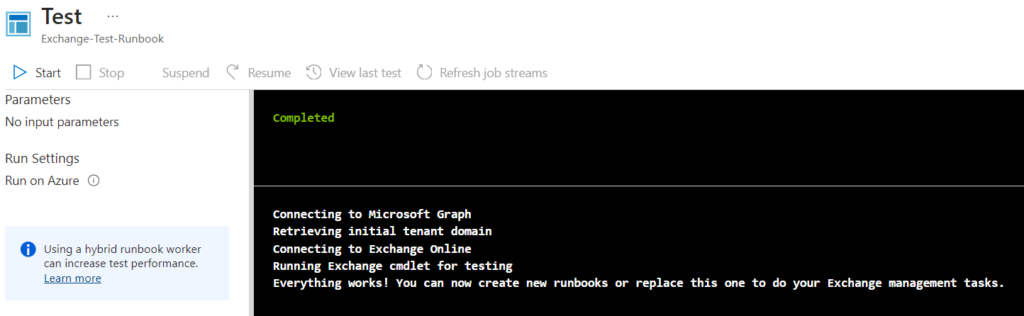
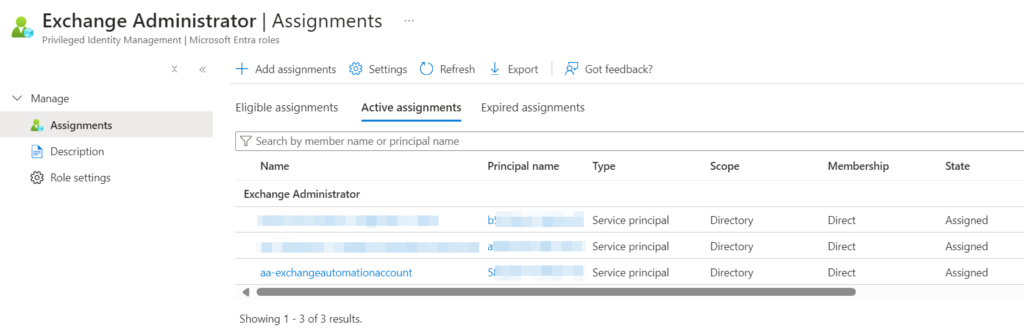
Wonderful! And, to verify, this is what has been added:
Conclusion
While the Microsoft Graph Bicep extension is a promising technology, it is still fairly limited in functionality. However, I’m eager to see how this module develops, and how it will affect the adoption of Bicep. Managing Microsoft’s entire cloud estate in one tool is a great idea, and will no doubt help build a bigger community for Bicep enthusiasts.
If you want to roll out environments like this, it seems Terraform is still your best bet. Feel free to use the code as you see fit!
Author
Discover more from Agder in the cloud
Subscribe to get the latest posts sent to your email.