
Microsoft has announced a big change on October 15, 2024. This change can potentially have a HUGE impact on your Microsoft 365 environment, but I will explain the change and provide several detailed suggestions for you in this post. Keep reading so you can prepare easily and effectively.
So what is about to happen?
In August 2024 Microsoft announced it will soon enforce MFA with NO exceptions when accessing various admin-portals (Link). The enforcement comes in two phases, and phase 1 is on October 15, 2024. From that date MFA will be mandatory for all users accessing these portals, without any exceptions. (Link)
- Azure portal
- Microsoft Entra admin center
- Microsoft Intune admin center
In early 2025 (exact date has not been announced) this list will expand to:
- Azure command-line Interface (Azure CLI)
- Azure PowerShell
- Azure Mobile app
- Infrastructure as Code (IaC) tools
Now obviously this should not be an issue for any company that have done their homework, because MFA is an absolute must in Identity security. However, facts are one thing and reality is another. In reality, I think most companies will likely observe this change, since in my experience, the MFA coverage is typically insufficient.
If you can’t prepare for this change in time, you have the option to postpone this change (information at the bottom of the previous link). But this should be the absolutely last resort, and it is a significant security risk involved in doing so.
So what do I need to know?
Do NOT ignore this change! Start focusing on this right away and involve your coworkers and stakeholders! Identifying the users affected and resolving the issue can require more time than initially anticipated. There are a few gotcha’s here which I think some people may miss out on:
- Your emergency-access (aka “Break-glass”) account.
- First of all, if you do not have this account in your tenant, stop right here and establish it along with monitoring and alerts! I mean it!!
- This account, which is your backdoor in when s**t hits the fan, will also be required to perform MFA from October 15th.
- Keep in mind that this account should be tested regularly (Microsoft suggests every 90 days).
- I strongly recommend securing this account using physical FIDO2 key(s).
- Service/workload identities configured with user accounts. Like scripts and automation etc.
- MFA will be required here as well
- Use workload identities like service principals and managed identities. These will not be affected by this enforcement.
- Are you using Privileged Identity Management (PIM) for delegating roles?
- They will now require MFA to log into entra.microsoft.com and activate their roles from there.
- I really hope you are already requiring MFA for activating roles, so this should not be an issue. If not: I can’t express how serious this is! These roles MUST be protected with MFA!

So how do I know who will be affected?
There are multiple methods to determine which users may be impacted, but unfortunately, none can guarantee complete accuracy and this will always be a best-effort approach. So I will present 3 different options to help you get started.
1. Conditional Access policies
The low-hanging fruit first: Have you already deployed a Conditional Access policy targeting the app “Microsoft Admin Portals“? (Screenshot below) If so, you are in luck! This policy targets the affected admin portals, so if this policy is deployed with MFA requirements, you can in theory begin with any exclusions you may have from this policy and go through those.
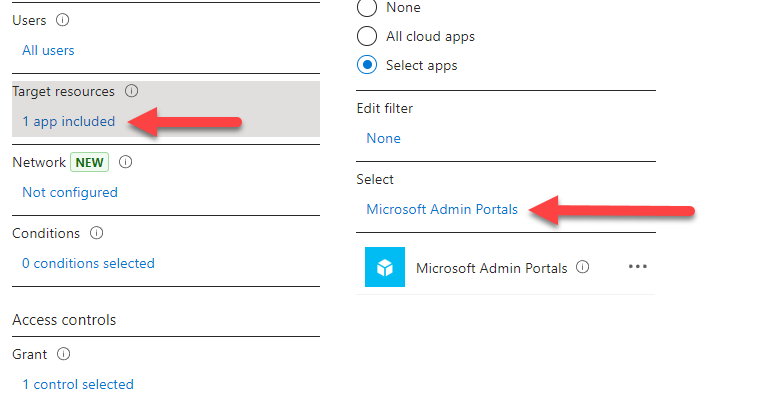
If you don’t have a policy like this deployed: I suggest you create one, ASAP. Just do 4 settings:
- Users: All users
- Target resources: Select Cloud apps and Select Apps and select Microsoft Admin Portals. (screenshot above)
- Grant: Require MFA
- Enable policy: Leave it at Report-only
This policy will not enforce any changes, but it will from that moment on, log any logins to the Microsoft Admin Portals and you will over time get a better list to work with. Those logins with status failed should be checked further to see if MFA is available for the corresponding user. Note that this will NOT check any logins in the past, only from the moment the Conditional Access policy is created. REwrite this:The details to check are further down.
Checking the results:
Depending on your environment you may have several options to check the result of your conditional access policy described above.
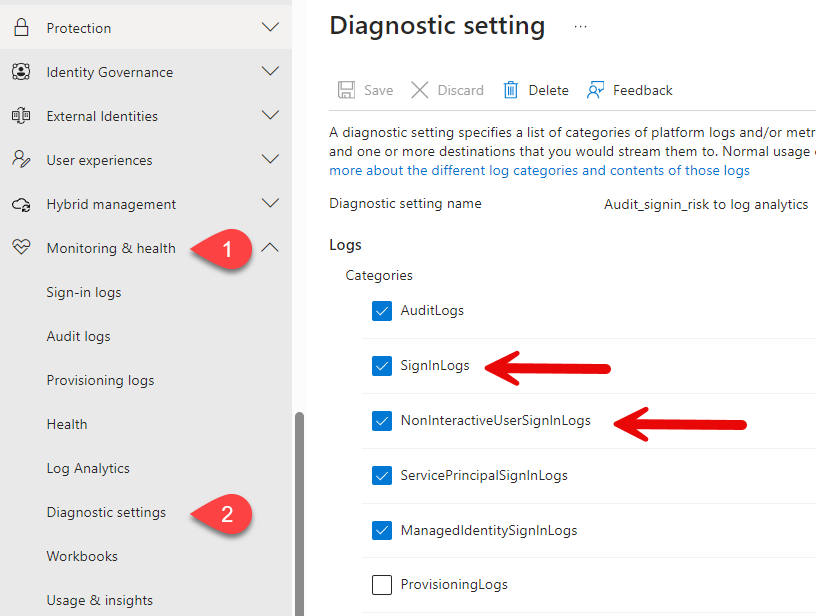
If your Diagnostic Settings are configured to send “SigninLogs” and “NonInteractiveUserSigninLogs” to Azure log analytics workspace (screenshot below), you can easily use Conditional Access – Insights and reporting to see the results.
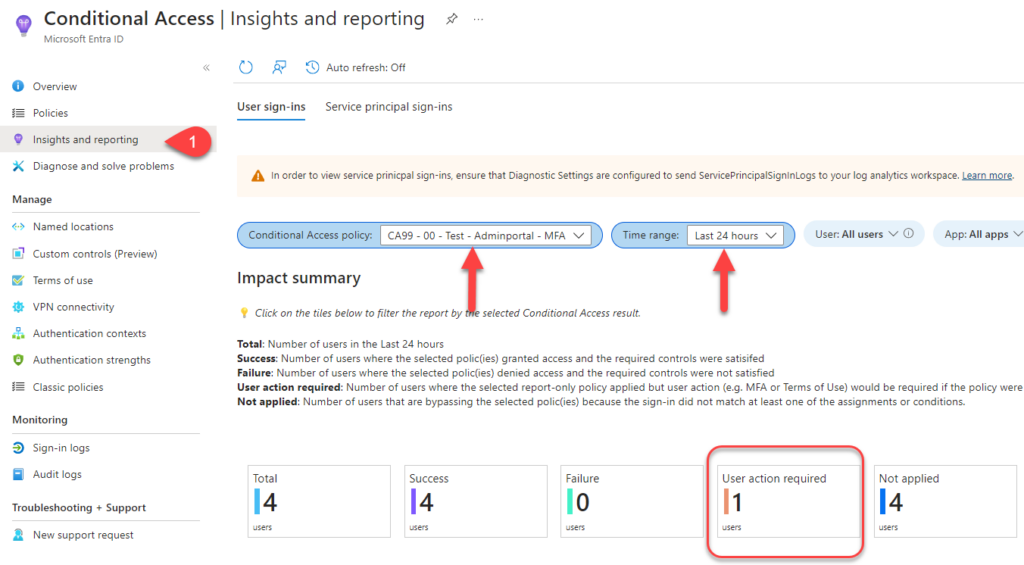
In The Conditional Access window: Navigate to Insights and reporting on the left side. Select your Condtional Access policy and your time frame. As you can see below, I have 1 user which would have needed a user action (register MFA in this case) if the Conditional Policy was enabled.
Scrolling down the page and further details then becomes visible. The “break-glass” account accessed the admin portal, resulting in a “reportonlyinterrupted” status, as indicated by the screenshot provided below. Had multi-factor authentication (MFA) been used for this login, the status would have reflected “reportOnlySuccess.” So from this I can conclude that my “break-glass” account needs to be checked for MFA capability.
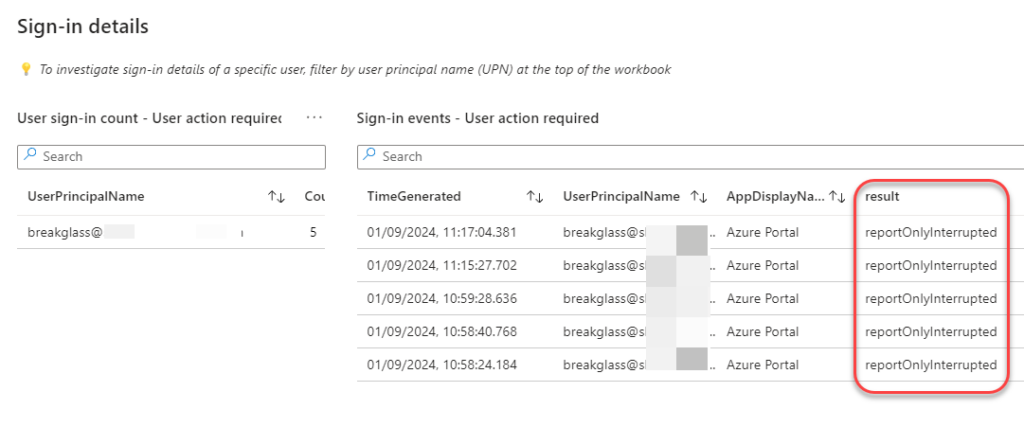
⚠️ A small clarification to prevent any mix-up: Although the AppDisplayName reads “Azure Portal” in the picture above, it’s important to note that the Azure portal, Entra ID admin portal, and Intune admin portal all share the same ApplicationID. Consequently, they will appear under the same AppDisplayName in the logs, as indicated in Microsoft’s documentation. (Link).
If you do NOT have log analytics or similar service available, this method is not very efficient. You can however still use the what-if button in Conditional Access to check users manually if this rule affect their login. You can also simply check the user’s sign-in log in Entra-ID where their “report-only” list will give you the estimated result..
2. PowerShell and signin logs
Another option is to use PowerShell and query the Sign-in logs directly in Entra ID. This method can go back in time, but only for 30 days which is the maximum time Entra ID stores Sign-in logs.
You are free to use and modify this script as you wish as long as you respect the Disclaimer in the script synopsis.
<#
.SYNOPSIS
Retrieves and processes Entra ID sign-in logs for Azure portal, Entra admin center and Intune admin center.
.DESCRIPTION
This script connects to Entra ID using the Microsoft Powershell Graph SDK and retrieves sign-in logs for Azure portal, Entra admin center and Intune admin center.
It processes the sign-in logs to extract details such as user principal name, authentication requirements, conditional access results, and multi-factor authentication (MFA) details.
The results are stored in a custom object for further analysis or reporting.
.NOTES
Author: Per-Torben Sørensen
Date: 2024-09-02
Version: 2409.01
Requires: Microsoft.Graph.Beta.Reports module
Tested with: PowerShell 7.4.5
.DISCLAIMER
THIS CODE IS PROVIDED AS IS WITHOUT WARRANTY OF ANY KIND. ALL USEAGE IS AT YOUR OWN RISK.
The entire risk arising out of the use or performance of this script remains with you.
In no event shall the author be held liable for any damages whatsoever (including, without limitation, damages for loss of business profits, business interruption, loss of business information,
or other pecuniary loss) arising out of the use of or inability to use this script, even if the author has been advised of the possibility of such damages.
The use of this script carries no support from the author, unless otherwise specified. By using this script, you agree to these terms.
#>
# Module check
if (-not (Get-Module -ListAvailable -Name Microsoft.Graph.Beta.Reports)) {
Write-Error "The required module 'Microsoft.Graph.Beta.Reports' is not installed. Aborting script."
exit
}
Import-Module -Name Microsoft.Graph.Beta.Reports
# Connect to Entra ID
Connect-MgGraph -Scopes "AuditLog.Read.All"
# Get the sign-in logs for the specified app ID
$signIns = Get-MgbetaAuditLogSignIn -Filter "appId eq 'c44b4083-3bb0-49c1-b47d-974e53cbdf3c'"
$results = [System.Collections.ArrayList]@()
# Process the sign-in logs
foreach ($signIn in $signIns) {
$userPrincipalName = $signIn.UserPrincipalName
$authrequirement = $signin.AuthenticationRequirement
$conditionalAccessResult = $signIn.ConditionalAccessStatus
$authmethod1 = $signin.AuthenticationDetails[0].AuthenticationMethod
$authmethod1success = $signin.AuthenticationDetails[0].Succeeded
$authmethod2 = $signin.AuthenticationDetails[1].AuthenticationMethod
$authmethod2success = $signin.AuthenticationDetails[1].Succeeded
$output = [PSCustomObject]@{
UserPrincipalName = $userPrincipalName
authrequirement = $authrequirement
ConditionalAccessResult = $conditionalAccessResult
AuthMethod1 = $authmethod1
AuthMethod1Success = $authmethod1success
AuthMethod2 = $authmethod2
AuthMethod2Success = $authmethod2success
}
$results.Add($output) | Out-Null
}
# Display the results
clear-host
Write-Host ""
Write-Host "Total number of sign-ins: $($results.Count)"
Write-Host "Total number of single-factor sign-ins: $(($results | Where-Object {$_.authrequirement -like "singleFactorAuthentication"}).Count)"
Write-host "Number of users with single-factor sign-ins: $((($results | Where-Object {$_.authrequirement -like "singleFactorAuthentication"}).UserPrincipalName | Select-Object -Unique).Count)"
Write-Host ""
# Save the results to a CSV file
$now = Get-Date -Format "yyyy-MM-dd_HH-mm-ss"
$savefile = "$env:USERPROFILE\Downloads\SignInLogs_$now.csv"
$results | Export-Csv $savefile -NoTypeInformation -Delimiter ";" -Encoding utf8
Write-Host "Results saved to: $savefile"
Write-Host ""
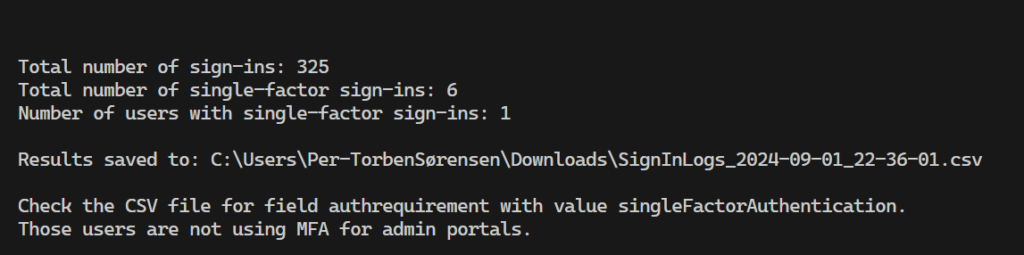
Write-Host "Check the CSV file for field authrequirement with value singleFactorAuthentication."
Write-Host "Those users are not using MFA for admin portals."
Write-Host ""
The output on the screen looks like depicted below, and the full results are stored in a .csv file in your downloads-folder with the date and time in the file name. Here we see I have 1 account over the last 30 days who has logged in to the admin portal with single-factor authentication.
3. KQL and Azure Log Analytics
If you’ve already sending data to Azure Log analytics then you can also query the logs as far back in time as the workspace is configured to keep data (the retention period) which is 90 days by default but can be extended to far longer.
Using the following query I can list out all the logins to the admin portal based on the appID mentioned earlier. These logins did not use MFA and the corresponding accounts should be checked.
// Define the app ID and authentication method
let appId = "c44b4083-3bb0-49c1-b47d-974e53cbdf3c";
let AuthFilter = "singleFactorAuthentication";

// Query the sign-in logs
SigninLogs
| where AppId == appId
| where AuthenticationRequirement has AuthFilter
| project TimeGenerated, UserPrincipalName, AppId, AuthenticationMethodsUsed, ConditionalAccessStatus, AuthenticationRequirement
| order by TimeGenerated desc
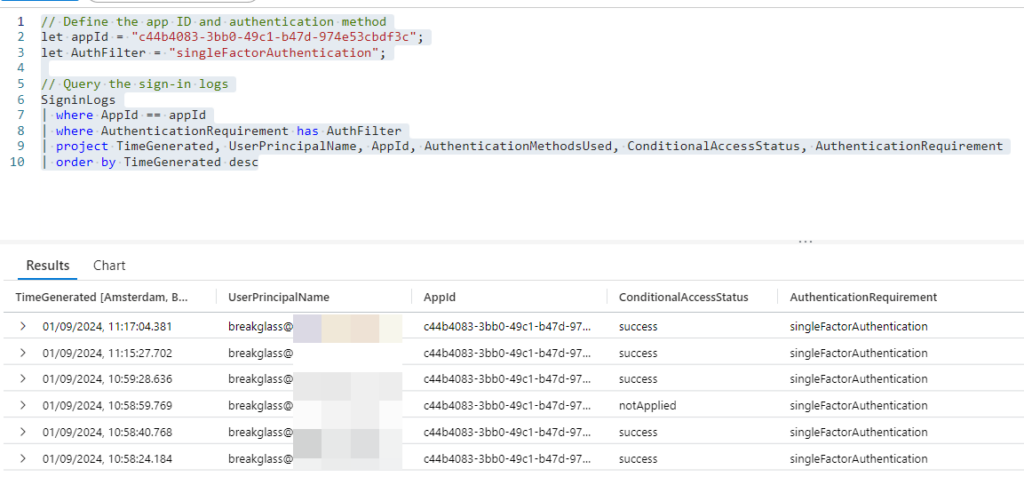
This example was for Azure Log Analytics but the same procedure should apply to any other log analytic solutions but may require some modifications to work properly.

So what do I do, now that the affected users have been located?
Check whether the user is MFA capable
Now you should have a list of users who have logged into the admin portals using single-factor authentication. But the fact that they didn’t use MFA to log in is not evidence that the users are not MFA capable. So the next step is to check that the users are MFA capable.
Just to clarify: The term “MFA capable” means if the user has any authentication methods registered on the account, and is capable to respond to an MFA request without any further configuration.
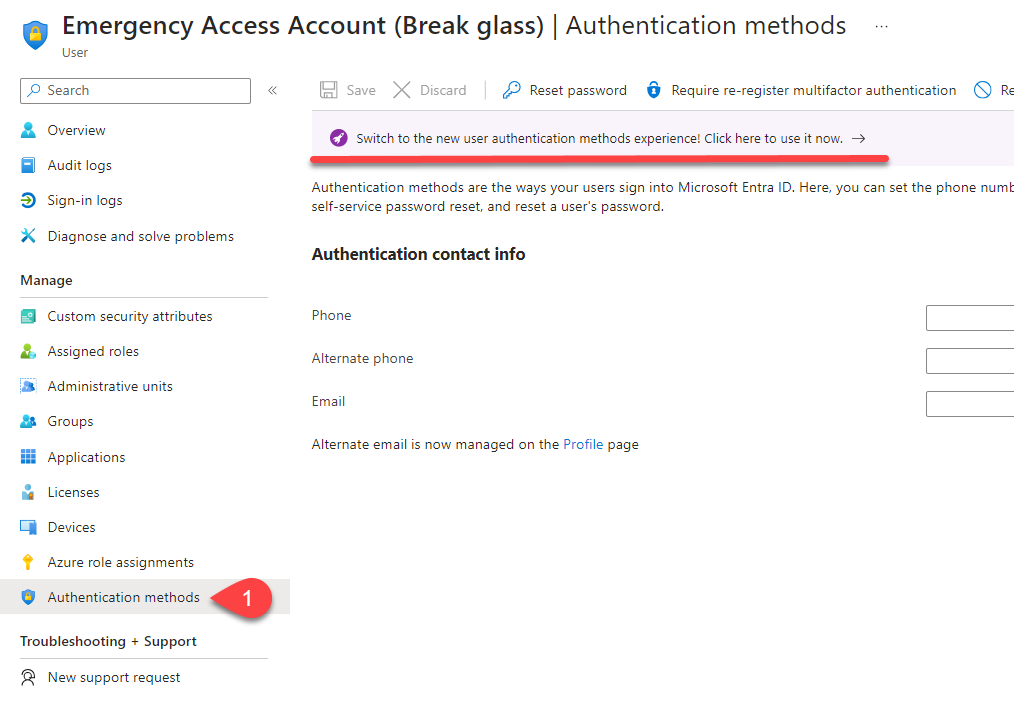
1. Entra ID portal: user account
In the Entra ID portal you can quickly check a users MFA capabilities by selecting the user account in question and select “Authentication methods” on the left side. (picture below) You should see a banner suggesting to use “the new user authentication method experience” (if you haven’t previously done so) and I highly recommend that your do. Don’t worry, you can switch between old and new experience any time you want, with a click of button. But I think the new experience is far better.
In the new experience (picture below) I can easily see that this user accounts has no MFA methods available, and will be blocked from logging in after October 15 until an MFA method is registered.

2. Entra ID Portal: Authentication methods
In Entra ID, you can also navigate to “Authentication methods” – “Activity” and you will see several summaries where the first one is how many users are not capable of MFA (picture below).

Click on this and you will see a new window, listing up the non-MFA capable users (picture below). Unfortunately this list will include all accounts, including meeting rooms and other resources which are disabled and never logs in interactively.
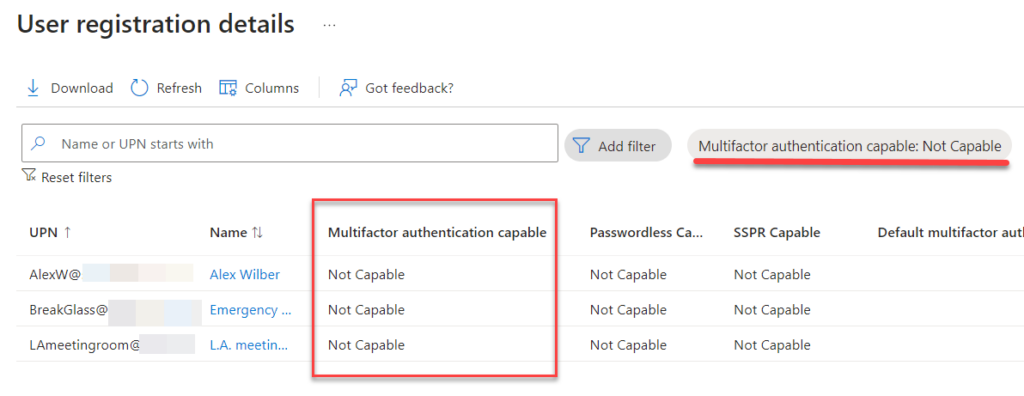
Also, comparing the previous two images, the first one says 6 users are not capable of MFA, and clicking into the report displays only 3 users. This is probably a delay in the statistics, but it is a good example of why I prefer PowerShell scripts for more reliable and updated results.
3. PowerShell
As always PowerShell comes to the rescue and is far more efficient to check multiple users. Add the UPNs to line “$upns =” (line 38) and run the script to check if they are MFA capable.
You are free to use and modify this script as you wish as long as you respect the Disclaimer in the script synopsis.
<#
.SYNOPSIS
    Checks if a user is MFA capable and lists the MFA methods configured for the user.

.DESCRIPTION
    This script checks if a user is MFA capable and lists the MFA methods configured for the user.
    The script uses the Microsoft.Graph.Identity.SignIns module to retrieve the MFA methods for the user.

.NOTES
    Author: Per-Torben Sørensen
    Date: 2024-09-02
    Version: 2409.01
    Requires: Microsoft.Graph.Identity.SignIns module
    Tested with: PowerShell 7.4.5

.DISCLAIMER
    THIS CODE IS PROVIDED AS IS WITHOUT WARRANTY OF ANY KIND. ALL USEAGE IS AT YOUR OWN RISK.

    The entire risk arising out of the use or performance of this script remains with you.

    In no event shall the author be held liable for any damages whatsoever (including, without limitation, damages for loss of business profits, business interruption, loss of business information,
    or other pecuniary loss) arising out of the use of or inability to use this script, even if the author has been advised of the possibility of such damages.

    The use of this script carries no support from the author, unless otherwise specified. By using this script, you agree to these terms.
#>

# Module check
if (-not (Get-Module -ListAvailable -Name Microsoft.Graph.Identity.SignIns)) {
    Write-Error "The required module 'Microsoft.Graph.Beta.Reports' is not installed. Aborting script."
    exit
}

# Connect to the Microsoft Graph API
Import-Module Microsoft.Graph.Identity.SignIns
Connect-MgGraph -Scopes "UserAuthenticationMethod.Read.All"

# Specify the list of user principal names (UPNs) to check
$upns = @("user1@domain.com", "user2@domain.com", "user3@domain.com")

# Initialize an array to store the results
$results = [System.Collections.ArrayList]::new()

# Iterate over each user
foreach ($upn in $upns) {
    # Get the user's MFA methods
    $MFAmethods = (Get-MgUserAuthenticationMethod -UserId $upn).AdditionalProperties

    # Extract @odata.type values from the methods
    $odataTypes = $MFAmethods | ForEach-Object { $_.'@odata.type' }

    # Determine if the user is MFA capable
    $isMfaCapable = $odataTypes.Count -gt 1

    # Collect the MFA methods, removing the '#microsoft.graph.' prefix
    $mfaMethodsList = $MFAmethods | ForEach-Object { $_.'@odata.type' -replace '#microsoft.graph.', '' }

    # Create a custom object for the result
    $result = [PSCustomObject]@{
        UserPrincipalName = $upn
        IsMfaCapable = $isMfaCapable
        MfaMethods = ($mfaMethodsList -join ", ")
    }

    # Add the result to the array
    $results.add($result) | Out-Null
}

# Save the results to a CSV file
$now = Get-Date -Format "yyyy-MM-dd_HH-mm-ss"
$savefile = "$env:USERPROFILE\Downloads\MFA_capable_$now.csv"
$results | Export-Csv $savefile -NoTypeInformation -Delimiter ";" -Encoding utf8

Write-Host "Results saved to: $savefile"
Write-Host ""
Write-Host "Check the CSV file to see the MFA capabilities of the users."
Write-Host ""
This script will create a .csv file in your Downloads folder, indicating whether a user is enabled for Multi-Factor Authentication (MFA) and listing the available methods.
And I need to repeat this: This is NOT a 100% reliable check! Even if there are MFA methods registered, we can’t tell if the method is available for use to the end-user. For example, the authenticator-app could be registered to an old phone, or the FIDO2 key could be lost or damaged. So this gives you a list of potential targets, but in the end you should consider a manual verification that they are MFA capable. In particular your “break-glass” account if it is on the list. Also any admin accounts should absolutely be MFA-enforced. Don’t assume! Verify!

Secure your accounts with MFA
Finally, I will demonstrate the swift process of setting up MFA for your “break-glass” account. This account is unique as it is not individually owned and serves as an emergency entry point to your system if you find yourself unable to access your tenant. Lockouts may occur due to improperly configured Conditional Access policies or various technical issues within the tenant’s environment. Microsoft’s instructions for creating an emergency access account can be accessed through their official guide here.
MFA on “Break-glass” accounts
A critical aspect frequently missed is the robustness of Multi-Factor Authentication (MFA) methods and their reliance on specific services to function correctly. The below illustration from Microsoft Learn (link), despite not depicting the user’s device, effectively demonstrates that a FIDO2 key is a strong choice for safeguarding your vital “break-glass” accounts.

So let’s get started.
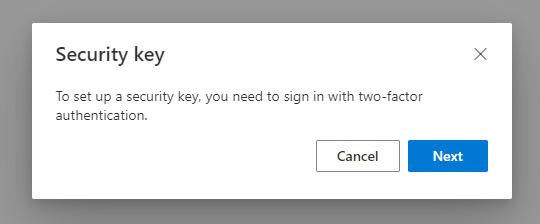
Earlier in this post we checked Authentication methods for my “break-glass” account, and verified it is missing any MFA methods. But I can’t just log in with this account and configure a FIDO2 key. That is because security keys (and passkeys) always require that you already have signed in with Multi-Factor Authentication (MFA). If you try to set it up anyway, you will be met with this message:
1. Prepare to set up MFA (…so you can configure MFA)
The easiest way, since this is a non-personal account, is to provide it a Temporary Access Pass (TAP) which is an MFA method used specifically to setup other MFA methods. TAP is often referred to as a bootstrap-method for this reason.
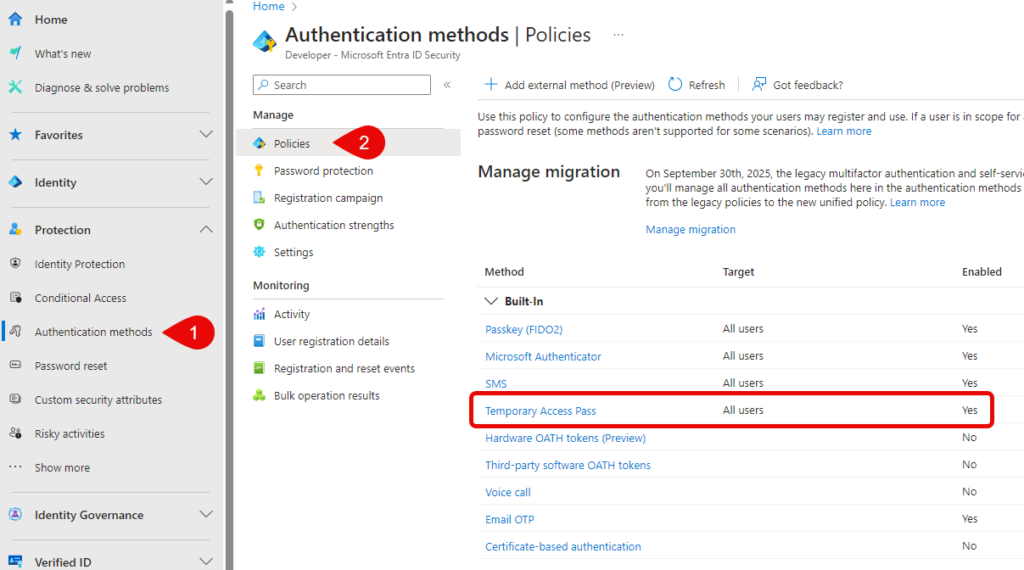
Make sure TAP is enabled by checking “Authentication Methods” – “policies” in Entra ID, and make sure Temporary Access Pass is enabled and scoped correctly.
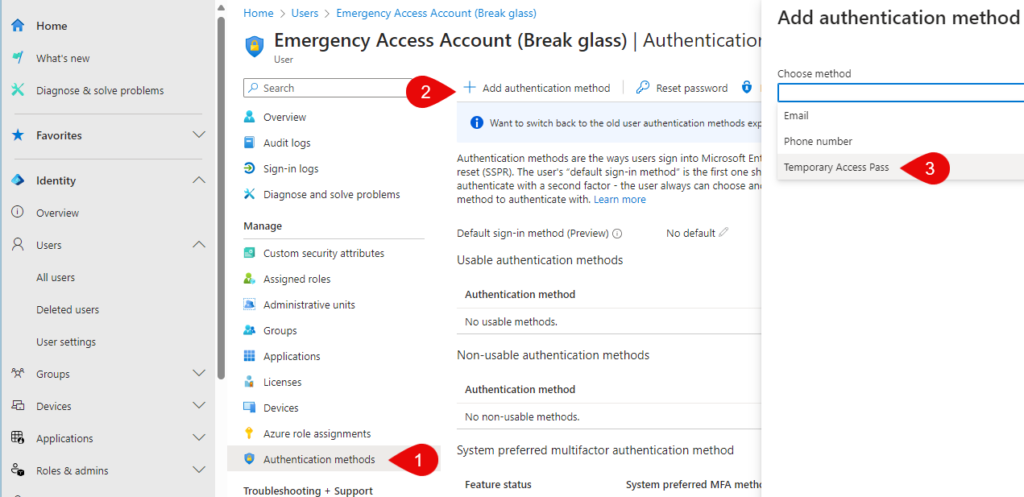
Next: On the user page, select “Autentication methods” and “Add authentication method” and then “Temporary Access Pass” and select “Add” on the next screen.
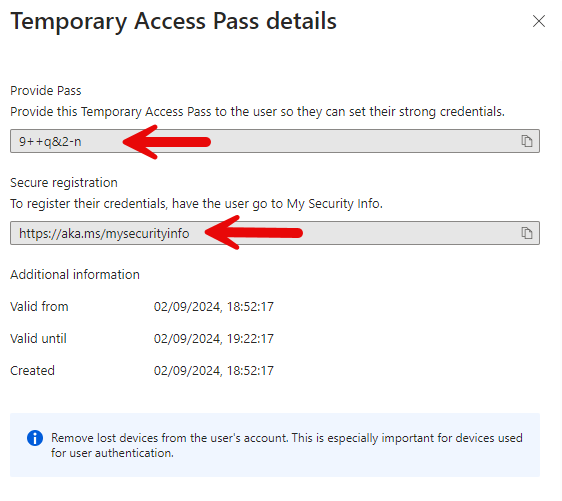
You will be presented with the TAP (picture below) and make sure to copy it because it can’t be found later. You also get the direct link for registering MFA. This TAP is configured as a one-time-use so I don’t blur it on the screenshot.
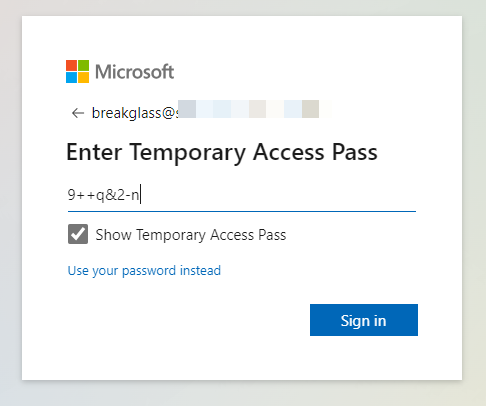
2. Use TAP to set up FIDO2
When an account has a Temporary Access Pass (TAP) available, it will by default ask for the TAP instead of the password. Here we just paste in the TAP from the previous step.
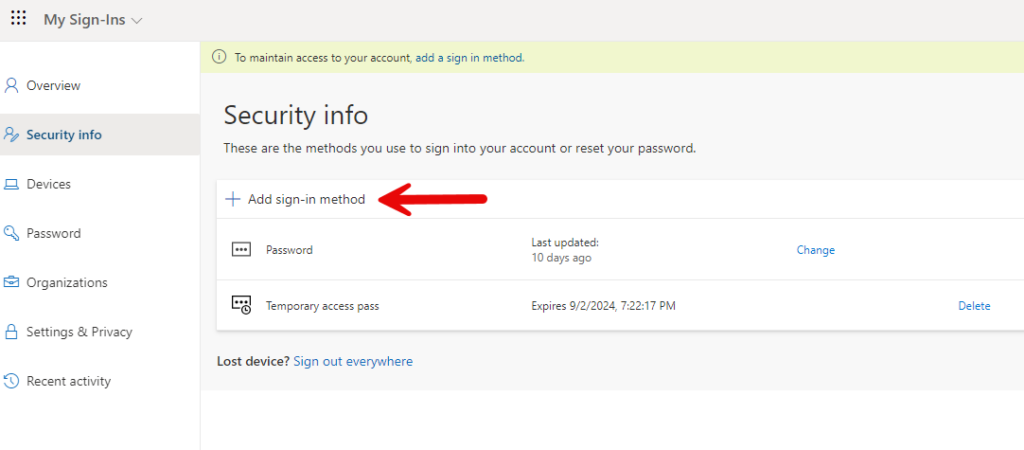
We arrive at this accounts security info and select “Add sign-in method“.
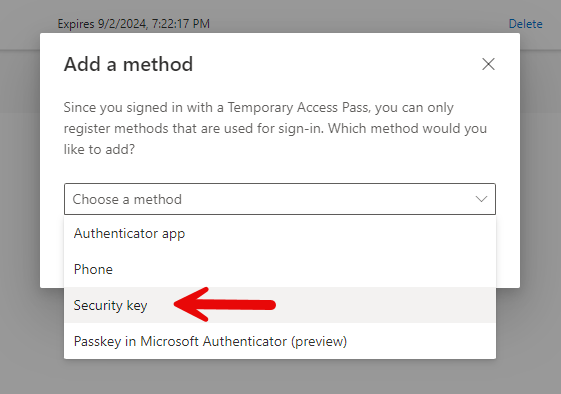
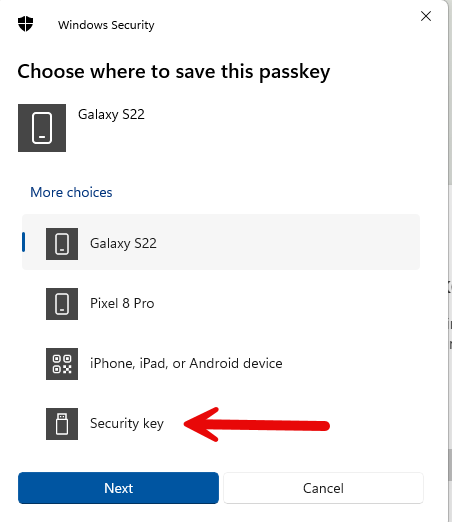
Select “Security Key” in the pop-up window.
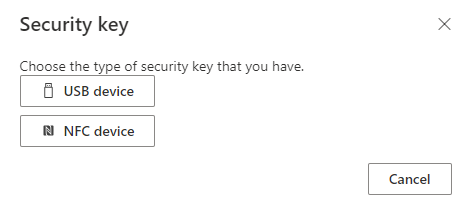
IMPORTANT: FIDO2 keys are available in a variety of shapes and sizes, each with its own set of functionalities. The following instructions are tailored to my specific FIDO2 key; however, you may need to adjust the steps slightly based on the particular model and features of your key.
I select USB device
Select “Security key” for where I want to save this passkey. Yes, I know. Microsoft refers to both Passkeys and physical FIDO2 security keys as “passkey”. While it may be confusing it’s technically not completely wrong. (But that’s another blog post)
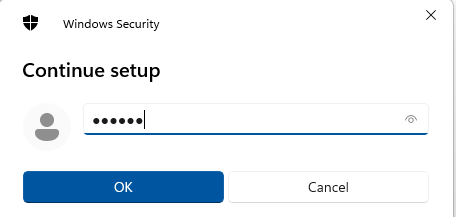
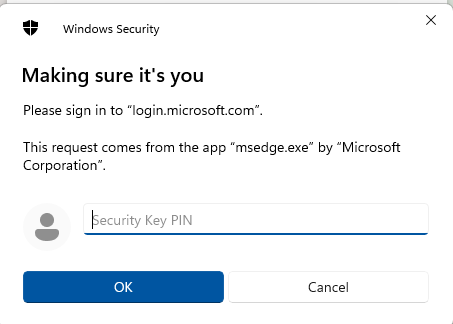
My key is PIN-protected so I enter my PIN. Again, your key may behave a little differently and that’s fine.
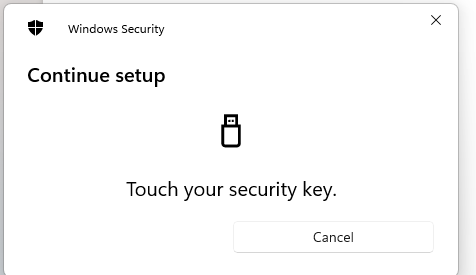
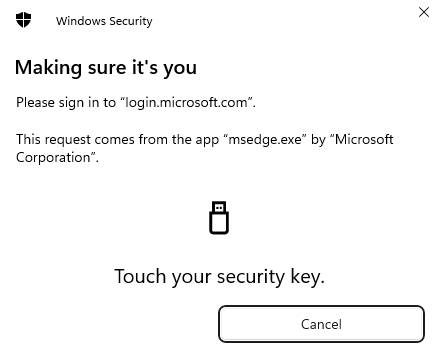
The FIDO2 key needs to be touched to verify that it is used locally and not access remotely.
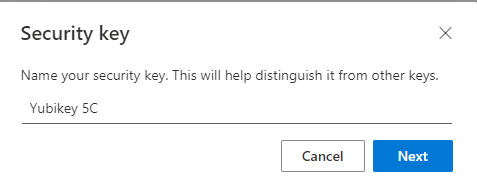
The key is successfully stored on my FIDO2 key.

Then I give it a name to recognize it. I usually just write my key model.
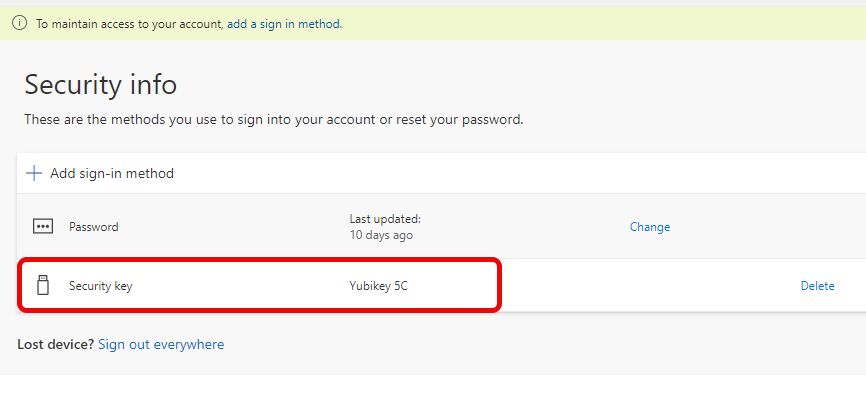
Back the the Security information screen, notice my TAP is now gone, and I have a security key to log in with.
3. Test login with FIDO2
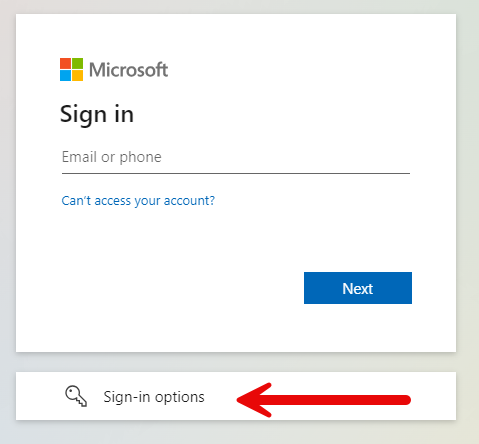
So before we call it a day, let’s test the FIDO2 key and verify that it works as intended. Now we can easily click on “Sign-in options” below, no need to enter your username.
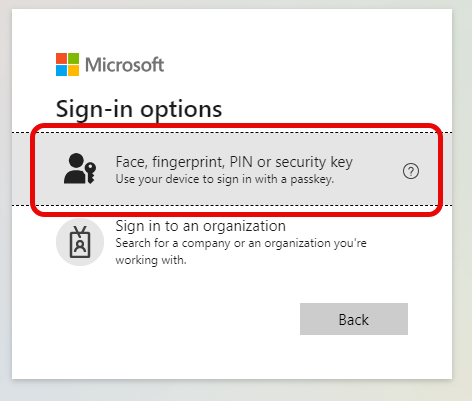
Select “Face, fingerprint, PIN, or security key“.
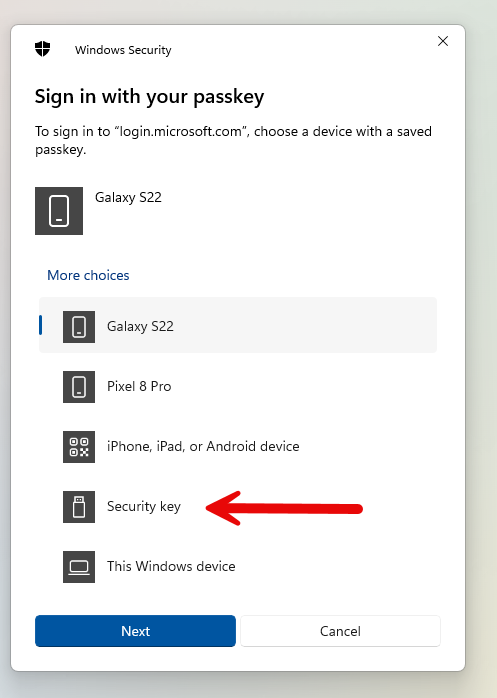
Then select which device to log in with, “security key” in this instance.
Enter PIN code and touch the key to prove it is used locally.
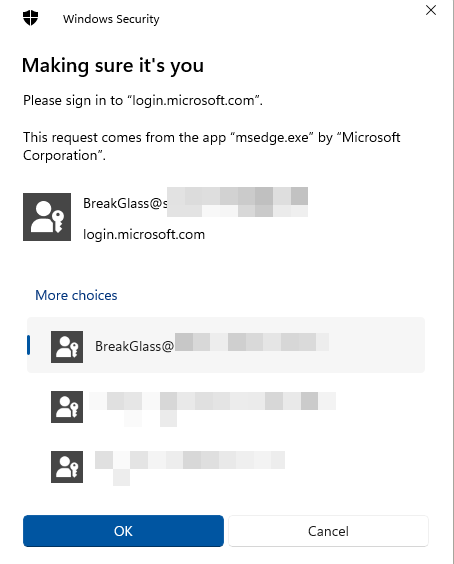
The accounts stored on this FIDO2 key is displayed and we can choose which one to sign in as and press “OK” in the bottom.
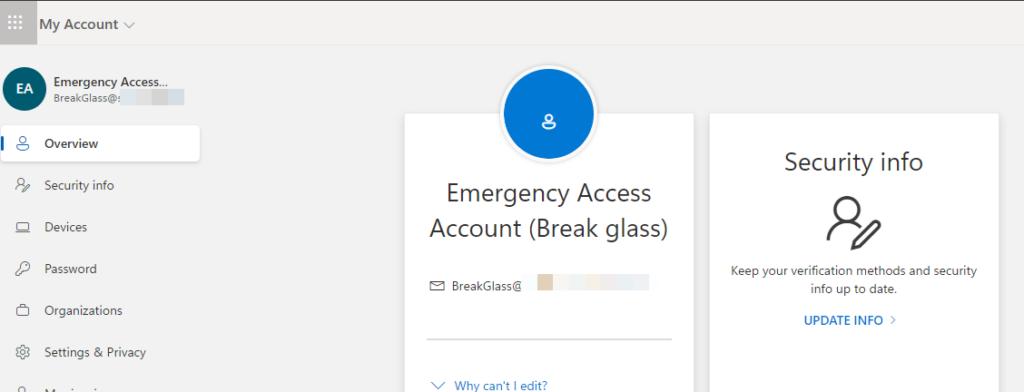
And that’s it, I am logged in as my “break-glass” account again.
Conclusion
In conclusion, while the methods presented to identify lockout-prone user accounts are not infallible, they serve as a critical starting point for getting ready for the big change on October 15. The implementation of a FIDO2 key, especially for a “break-glass” account, is a significant step towards fortifying account security and it has my strongest recommendation.
As I write this, we have about a month and a half before MFA is enforced on all access to admin portals, so please don’t ignore or postpone this. Make sure you have access to admin portals using MFA, and use this opportunity to give your “break-glass” account some extra attention.
Author

Discover more from Agder in the cloud
Subscribe to get the latest posts sent to your email.