In part 1 I introduced the fundamental flaw of Conditional Access policies and the broad strokes on how to fix it. I also talked about MFA adoption and how it is connected to Conditional Access policy coverage. Also please keep in mind the analogy of the room with all the doors which need to be closed and locked. Did that not make sense? Then go read part 1 before you continue!
Now I’ll show you all the important details in my recommended way to implement and harden your Conditional Access policies. ❤️
Before we dive onto this, I want to stress that this will only give you a starting point! This is the foundation where you can keep building all your Conditional Access policies upon. Remember: Conditional Access keeps evolving and expanding, and therefore your policies should do the same!
A static Conditional Access setup = Bad! 👎
Also keep in mind that this isn’t a perfect solution either. Security is vast and complex, and there is no one-tool or one-rule which will magically just fix it. But when working with SaaS solutions, like M365, identity is your primary security boundary, and Conditional Access is your primary tool for this job.
The 5 steps to harden your Conditional Access policies
As mentioned in part 1, this solution has 5 steps:
- Identify your personas and set your naming standard
- Establish corresponding Entra ID groups
- Set up the block-by-default rule
- Systematically assign policies to the personas
- Hardening using Restricted Administrative Units (RAU)

1. Identify your personas and set the naming standard
This is not a technical job, this is what I like to call a “pen-and-paper exercise” and it requires that the participants know the company from at non-technical point of view. Simply put, identify all different personas in your tenant so you can better design Conditional Access policies to fit their needs and still maintain security.
PLEASE don’t just copy of either this post or someone else, particularity if you have a large or complex environment. The whole point is to have a framework adapted to YOUR tentant.
What is a persona? In this context, a persona represents a group of users with similar roles, responsibilities, and access needs within your organization. For example, you might have personas for administrators, users, students, and guests.
Why it matters for Conditional Access: Conditional Access policies control how and when users can access resources. By defining personas, you can create more precise and effective policies. For example, you might use FIDO2 keys for administrators’ MFA, while regular users use an authenticator app. Additionally, you could restrict access to sensitive data for external contractors.
An example could look like this, yours can look different and be larger, and that’s fine:
- 00 – Global (All users)
- 01 – Admins (All accounts with active, or eligible to, roles)
- 02 – Users (Ordinary users)
- 03 – Serviceaccounts
- 04 – Guests (Guest accounts)
- 99 – Test (Dedicated for tests/demo etc in Conditional Access policies)
Namingstandard
Now that you have the list you set up the naming standard as follows:
CA(Personanr.) – (Seq.nr) – (Persona) – (Target) – (Requirement)
In this context, “Baseline” is a term I use to refer to the minimum requirement applicable to all accounts within that persona. This approach ensures there are no gaps in policy coverage, as discussed in part 1.
Examples:
- CA01 – 00 – Admins – Baseline – Req.MFA
- Baseline config for all accounts in the Admins-persona, which will always require MFA at login
- CA02 – 03 – Users – VivaEngage – Req.CompliantDevice
- Members of the Users-persona must use a compliant device in order to access Viva Engage
Why this structure? Now, you only need the first two numbers to uniquely identify your Conditional Access policy in your tenant. This makes troubleshooting much easier, as you can simply state, ‘CA02 – 05 is the issue.” I find this particularly useful when looking at signin-logs where you only see the first part of the policy name.
2. Establish corresponding Entra ID groups

Nothing particularly exciting, create Entra ID security groups which corresponds to the personas you got from the previous step.
Except “Global” which is all users, and guests have their own settings so a separate group for guests is optional.
Just make sure you use dedicated groups for this purpose and make them cloud-only.
3. Set up the block-by-default rule
Ok, NOW things get very interesting!
‼️And they also get potentially dangerous ‼️
First things first: YOU CAN LOCK YOURSELF OUT OF YOUR OWN TENANT IF YOU ARE NOT CAREFUL So be 100% sure you have a working and tested break-glass account, which is Global Admin, available before you do anything!
We create the Conditional Access policy named “CA00 – 00 – Global – All – Block” and scope this to:
- Users: All users
- Exclude the CA-groups
- Exclude your break-glass account(s)
- Target resources: All resources
- Grant: Block Access
- ‼️Put it in Report-only for now ‼️
This is the rule which mimics the new default behavior of Conditional Access. It should look something like this:

The beauty here is the level of control you through this setup. If an account is not on this exclude-list, then it cannot log into this tenant. Again: Check and double-check that your admin-account is a member (not owner) of the CA-groups is listed, and that you have access to a working break-glass account BEFORE you turn on this policy!
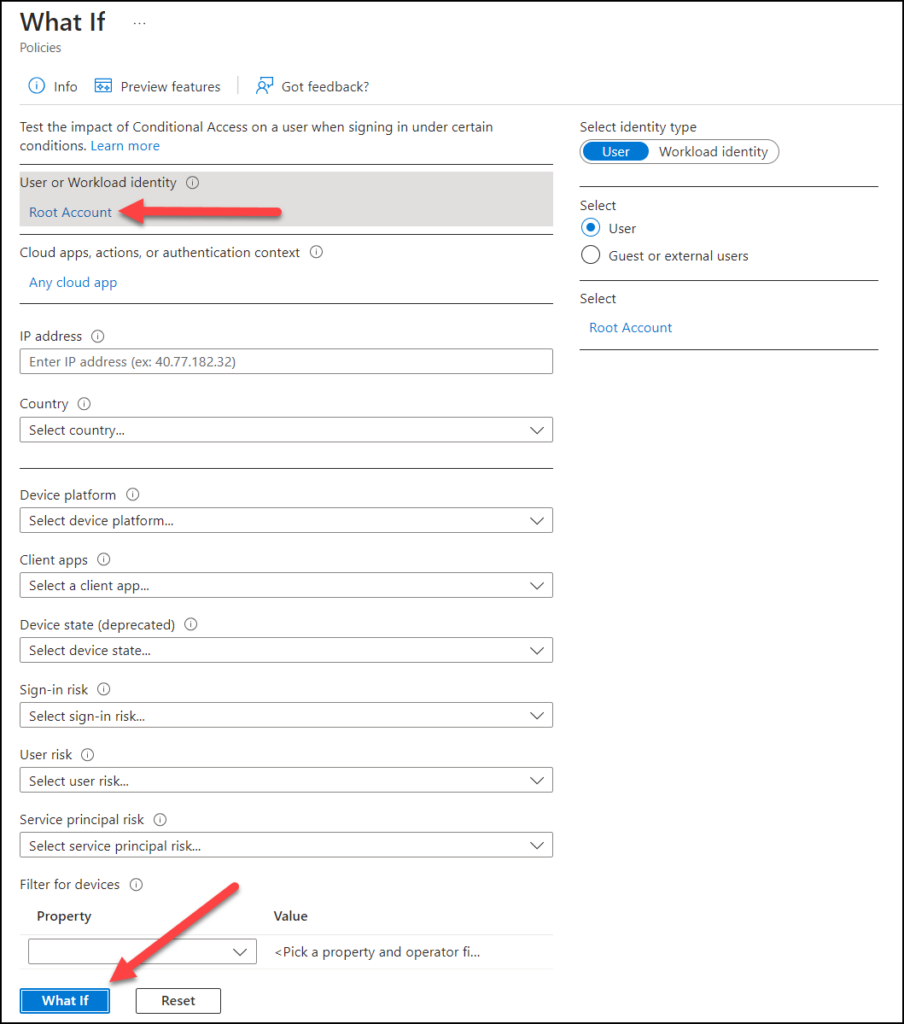
I strongly recommend that you use the “what if” tool to verify that this policy will not block your admin account before you turn it on!
The “what if” tool is located above you policy list.

In here you can select your account at the top, and click “What if” at the bottom. No need to add more details for now.

Now scroll further down to see the result. Locate the policy you just created (“CA00 – 00 – Global – All -Block”) and your account is safe if you find it under “Policies that will not apply”. The reason should be “Users and groups” indicating that your account is in the exception list, probably through group membership in “CA01 – Admins”.

✅ If you find the “CA00 – 00” policy under “Policies that will not apply“, then the user you specified will not be blocked by this policy.
⛔ If you find the “CA00 – 00” policy under “Policies that will apply” then the specified account will be blocked if the policy is turned on.
Most of you will be in an environment where you already have your own Conditional Access setup. So you will need to undertake a migration of users from your current setup to this new one. And if that’s the case, don’t turn on the CA00-00 rule until you are ready.
4. Systematically assign policies to the personas
Now that the block-all rule (CA00 – 00) is there, we need to make sure that every entry in its exception list get a new policy for its baseline protection. So jumping back to the first screenshot in step 3: We have 5 exceptions in the “CA00 – 00” rule and now they all must be secured through their own baseline policy. The exception here is the break-glass account, which should be excluded from CA policies and secured with a physical FIDO2 key and monitoring with alerts at login.
- Admins
- Users
- Guests
- Service accounts
- Breakglass-account
We do this by adding our baseline-policies for each persona, which also corresponds with the exception list on the CA00 – 00 policy. They will look something like this:

As for scoping these – just follow the groups from step 2.
- CA01 – 00 is scoped to the group CA01 – Admins
- CA02 – 00 is scoped to the group CA02 – Users
- CA03 – 00 is scoped to the group CA03 – Serviceaccounts
- CA04 – 00 is scoped towards guests accounts (or their respective group if you chose to make it)
A critical point now is that any and all exceptions from these policies, gets a new and dedicated Conditional Access policy tied to a dedicated group (step 2), assigned to them to ensure they still have at least one policy for protection.
For example: Let’s imagine that a specific user can’t do MFA because (Insert whatever reason works for you), and must therefore be excluded from “CA02 – 00”. This means that this account must get a separate Conditional Access policy which secure that account in a different way. (Look at “CA02 – 02” on the screenshot further down).
If you follow this pattern consistently, you will end up with a setup where every single account in your tenant gets at least one Conditional Access policy when logging in. Remember from part 1, this is also vital for the MFA adoption in your tenant.
Now you have the baseline protection, but of course there are a ton of other settings to enable. I would strongly recommend that you use additional policies for adding more requirements or adding exceptions. Another advice is to try to leave the baseline-policies as simple as you can, and it will be so very much easier to plan and troubleshoot as your Conditional Access policies grow in number. I generally prefer more policies with fewer settings in each, but it is not without its drawbacks and in the end it depends on your environment really.
I will show you an example from my demo environment. The settings are for demonstration purposes ONLY and should not be considered a design, advice or a recommendation!

But which settings should we set in each policy?
Frankly, that’s not up to me. A company, including its security department, IT department, and other stakeholders, must decide on the settings for their Conditional Access policy. These policies need to be tailored to the specific needs and risks of the organization. Things like the systems used, user roles, and data sensitivity affect how the policies should be set up.
Security is absolutely a team sport and involving more than just IT people is a must! While implementing MFA on all accounts is essential, as discussed in part 1, security encompasses much more than just MFA. There is no single solution that fits all scenarios, and it’s crucial to understand your specific environment to develop effective security recommendations.

5. Hardening using Restricted Administrative Units (RAU)
Now you can start populating the CA-groups with users and groups so they can be protected by your new and glorious Conditional Access regime! Group nesting works here, so you can also add your existing groups into your CA-groups. Although you should always take a moment to consider the implications. A part of this regime is to prevent lateral movement if an intruder tries to establish his/her own identity in your tenant. Can your existing groups be considered safe? How strongly/literally should you adhere to Zero-trust and “assume breach”? I don’t have the answer to that, but it’s something you and your IT and management colleagues should have an honest conversation about.
❓But what about your CA-groups? They are now essentially your “allow to log in“-filter for your tenant. ❓Should you restrict who can change the membership of these groups? Well, I think you should.
This is where Restricted Administrative Units (RAU) comes in. The short description: They enable you to delegate permissions to specific users, groups, or devices while simultaneously preventing other admins in your tenant from making changes.
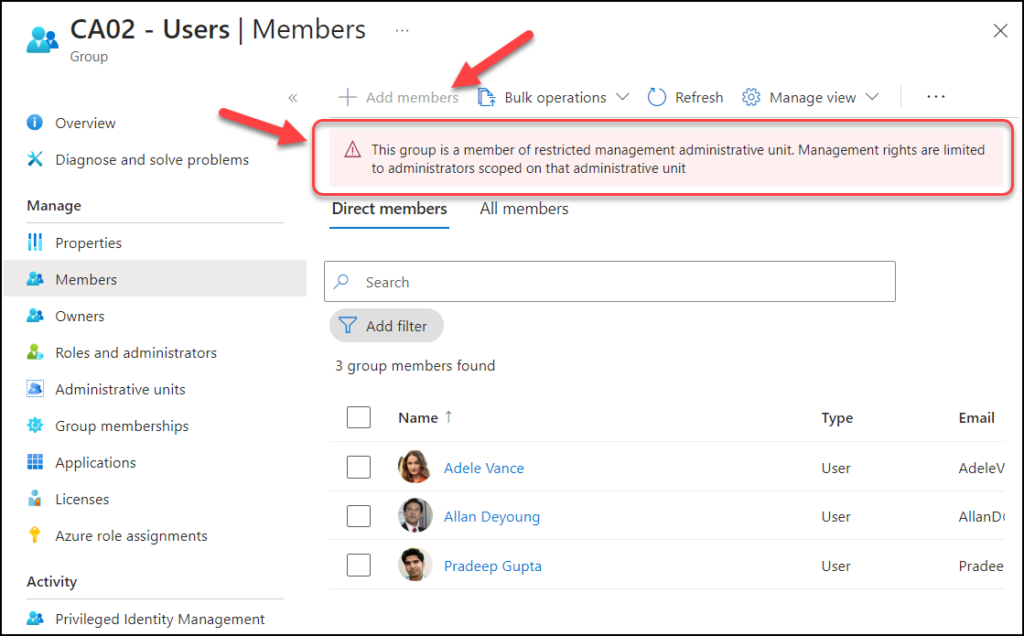
So now I will use a RAU to only let a few specific users be able to set the membership in the CA-groups in this tenant. No one, except the specified users, can change the membership of these CA-groups.
Setting up RAU to protect your CA-groups
Start by logging in to Entra ID -> Roles and Admins -> Admin Units or follow this direct link.
Add a new AU with a name but make sure you set “Restricted management administrative unit” to “Yes“. This can not be changed later.

Under “Assign roles” you click “Groups Administrator“.

Here you can select the people who will be groups admins for your CA-groups and click “Add” at the bottom when your done and then “Create“. I’ll select Adele, Alex and Allan in this example.

You should now see your new RAU, verify “Restricted management” is set to “Yes” and click into it.

Select “Groups” on your left side, click “Add” and add your CA-groups and they should appear in your list.

Congratulations! The users you added to your RAU, (Adele, Alex and Allan in my example) are the only persons in your entire tenant who are allowed to administer these groups, including their membership. Everyone else, regardless of their access, is blocked.
As you can see, even my admin account (which is Global Admin) is prohibited from changing the membership or deleting the group since my account is not admin in the RAU.

Delegate with care!!
Like I mentioned this isn’t a watertight solution and if you are not careful with delegation of roles, people can easily change or circumvent your setup. Here are a few roles you should be extra careful with:
- Global Administrator:
- Has a blank mandate in your tenant, and can do pretty much whatever they want.
- Privileged Role Administrator:
- Can change or delete any RAU they want.
- Privileged Authenticator Administrator:
- Can change or delete password/MFA settings on all accounts – including Global Admins!
- Security Administrator:
- Can change/delete all Conditonal Access policies.
- Conditional Access Administrator:
- Can change/delete all Conditonal Access policies.
- Groups Administrator, User Administrator:
- Can manage group memberships.
Conclusion
By following these five steps to harden your Conditional Access policies, you’re taking significant strides towards securing your organization’s digital environment. Remember, these settings is all about “locking all the doors” I mentioned in part 1. This is not a perfect, complete or a watertight design, but it is meant to give you a foundation to continue to build your identity security.
As you implement these strategies, you will address what I consider the critical flaw with Conditional Access, which is its “allow-by-default” behavior. Also don’t forget to regularly check your MFA adoption rates and keep on working towards complete MFA coverage. Ensuring that MFA is widely adopted across your organization is crucial for maintaining robust security.
Stay tuned for Part 3, where I’ll share some more general tips and tricks on managing your Conditional Access policies.
Take care, and thank you for reading!
Discover more from Agder in the cloud
Subscribe to get the latest posts sent to your email.


