This post is a continuation from part 1
Now that we’ve learned how to connect to Cloud-IQ and adjust license quantities in a subscription, it’s time to integrate this process with Entra ID Governance. In this example, we’ll assign licenses using an Access Package, streamlining the process. Keep in mind that this method requires an Entra ID Governance license to activate the feature.
Select Where You Want to Run Your Integration
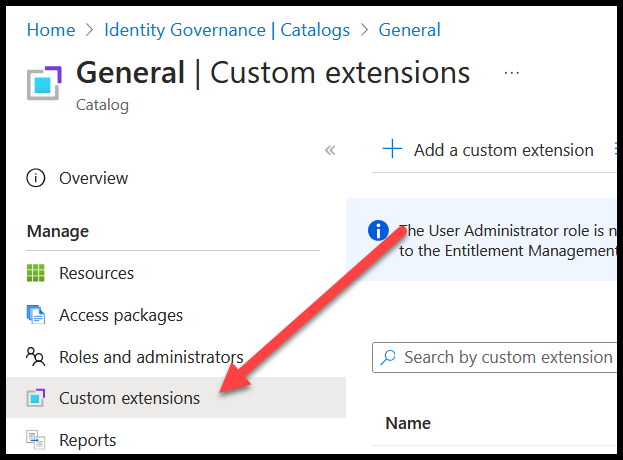
Start by selecting the catalog where you want to create the access package. Ensure the custom extension is created in this catalog; otherwise, the access package won’t be able to use it. In the catalog, go to Custom Extensions. Here, you’ll set up the connection between your access package and Cloud-IQ. A custom extension is like a logic app with built-in triggers and information from the access package, making the setup simpler.
Create Your Custom Extension and Deploy the Logic App
From the blade, select Custom Extensions and then click Add a Custom Extension. This custom extension can be used by all access packages within the catalog.
Basics: Start by giving your new custom extension a name and description.
Extension Type: Select Request workflow to define when the extension will be triggered.
Extension Configuration: Click Launch and Continue to proceed with the setup.
In the Details section, create a new Logic App. This will automatically add the initial triggers required for the workflow. Choose your subscription and resource group, then name your new Logic App to complete the setup.
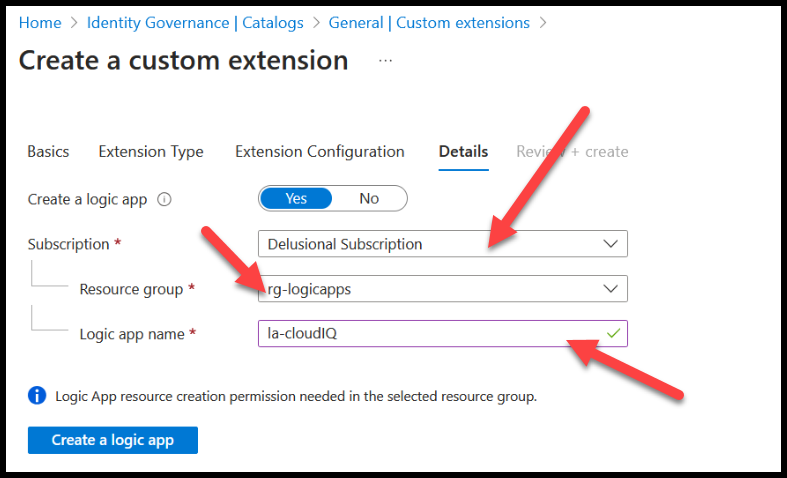
The custom extension will appear in the Custom Extensions section within the catalog.
Create a Basic Access Package
Now it’s time to create an access package. In this scenario, the access package will manage access to a security group that provides the Microsoft 365 E3 license. This includes assigning users to the group or removing them as needed. We’re assuming the security group is created and configured as assigned.
Go to your Catalog -> Access Package and click New Access Package. Here, we’ll create a basic access package to show how the automated license assignment and purchase processes work. Detailed steps for more advanced configurations will be covered in future posts.
Start by naming your access package and adding a clear description. In Resource Roles, include the security group that assigns the license. Enable the access package for new requests, and set up Lifecycle expiration and Access reviews to align with your company’s policies. For this example, we’ll keep it simple by setting Lifecycle expiration to never and Access reviews to no.
Next, define when the access package should trigger a call to the Custom extension. For this setup, we want the Custom extension to be triggered in two scenarios: when a request is approved and when an assignment is removed.
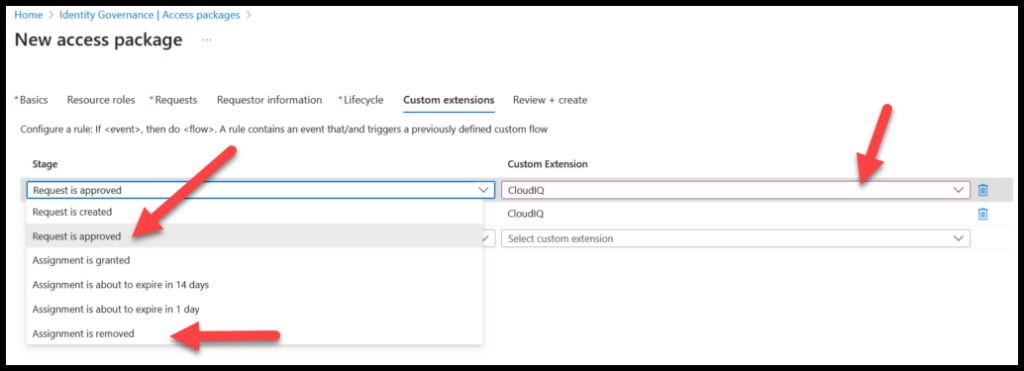
Let’s Configure the Logic App!

Now, it’s time to go to the Logic App and start configuring it. Return to Catalog -> Custom Extensions and click the link to open your custom extension. Then, go to Development Tools -> Logic App Designer.
Step 1: Create a Token for Authentication
Name your HTTP request “login”. This request will be used to authenticate and retrieve the access token. A tip is to name your steps with clear, descriptive names that make it easy to identify their purpose and to target them from other steps.
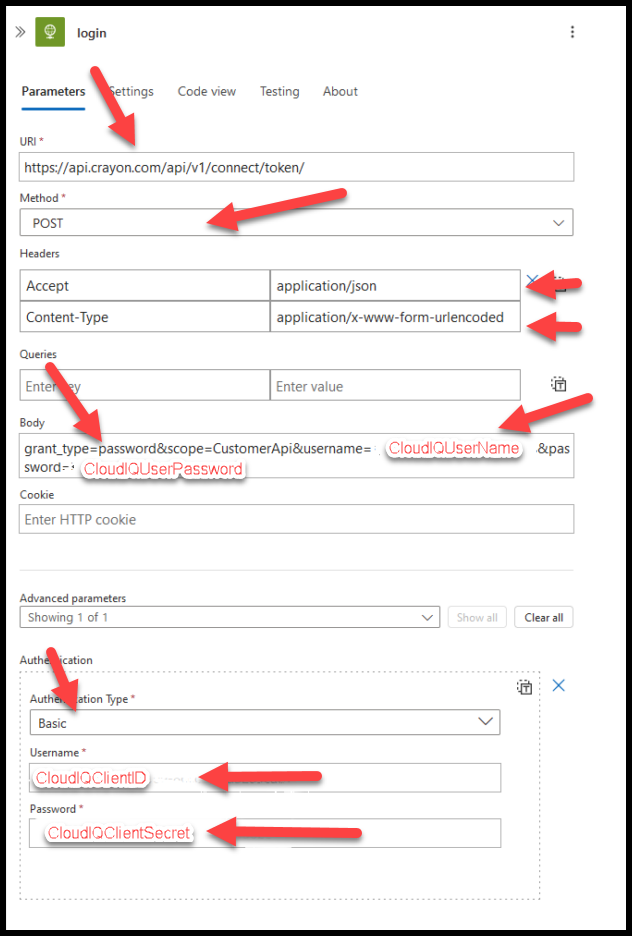
For better security in a production environment, credentials (like passwords) should be pulled from a Key Vault instead of being written directly in the request body. This helps keep sensitive information safe.
Step 2: Get the Subscription and Quantity
Now that the app can successfully sign in to Cloud-IQ, it’s time to retrieve the subscription details. This will provide the necessary information for the update, including the current quantity of the selected subscription.
Add another HTTP request to the flow. This request will use the access token for authentication to Cloud-IQ. In the Authentication Type field, select Raw, and in the Value field, enter Bearer followed by the expression body('login').AccessToken to fetch the token from the login HTTP request.
Step 3: Create a Condition for Add or Remove Flows
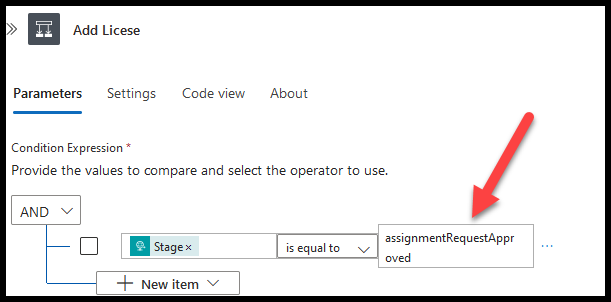
Now that we have the current quantity, we check whether licenses need to be added or removed. We do this by using a condition that looks at the fields from the manual trigger. The manual trigger provides the stage we set in the access package and other details about it. A sample can be found in the code snippet triggerbody.
When selecting a field in a Logic App, you may have noticed a popup with fx and lightning symbols. We’ll use the lightning symbol (dynamic content) for this step. Select Stage from the list, which you can find under manual.
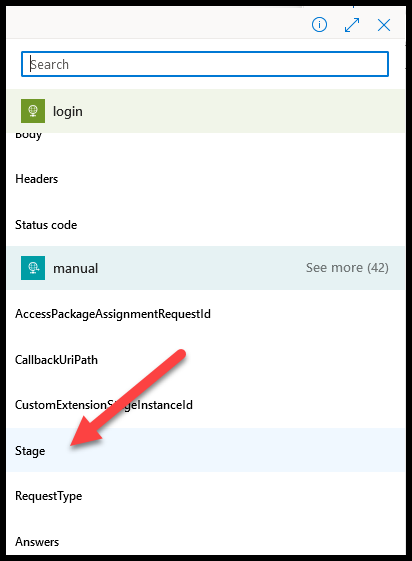
We know that our Logic App is triggered only when a request is approved or when an access package is removed. Therefore, we can set our condition to check for assignmentRequestApproved. For a list of available values, you can refer to the Microsoft Docs
These are the fields available for use. The easiest way to figure this out is by creating an empty custom extension, triggering it once, and then checking the output of the run. Alternatively, you can just use the code snippet below 😉
available in trigger body
{
  "AccessPackageAssignmentRequestId": "e1884469-b83f-447f-a63a-630f339c303a",
  "CallbackUriPath": "/identityGovernance/entitlementManagement/assignmentRequests/e1884469-b83f-447f-a63a-630f339c303a/resume",
  "CustomExtensionStageInstanceId": "9d096160-e8f6-4652-84ad-49488a715fcb",
  "Stage": "AssignmentRemoved",
  "RequestType": "adminRemove",
  "Answers": [],
  "State": "delivered",
  "Status": "Fulfilled",
  "CallbackConfigur…tSecId": null,
  "DisplayName": "Sandra Saluti",
  "PrincipalName": "sandra.saluti@delusionaldev.onmicrosoft.com",
  "Email": "sandra.saluti@delusionaldev.onmicrosoft.com",
  "OnPremisesSecurityIdentifier": null,
  "Type": "User",
  "SubjectType": "user",
  "SubjectLifecycle": "notDefined",
  "CleanupScheduledDateTime": null,
  "CreatedDateTime": null
}
Step 4: Create the Body for Our Update Request
Based on the condition, we now know whether we need to add or remove a license. In this step, we’ll focus on adding a license. This will be the most technical part of the process, as it involves using several built-in Logic App actions.
- body: Used to retrieve the output from a previous step, in this case, the “get subscription” step.
- setProperty: Used to update a field in an object, in this case, the Quantity field in the body from the “get subscription” step.
- using the add function instead of directly adding with
+
Add a Data Operations step: In the Inputs field, click the fx button and enter the following expression
setProperty(body('get_subscription'), 'Quantity', add(body('get_subscription').Quantity, 1))
This might seem complex, so let’s break it down and go through each part step by step in order of execution.
body('get_subscription').Quantityis called first. This retrieves the current quantity of licenses from the previousget_subscriptionstep, and then passes that value to the next function.add(body('get_subscription').Quantity, 1))adds the current quantity with 1 returning the new quantitysetProperty(body('get_subscription'), 'Quantity', ...)the first parameter is the object we want to modify, in this case the body from get_subscription. The second parameter is the field we want to modify, in this case Quantity. The third parameter is the value we want to set, in this case the new quantity calculated with add
The removal step is almost the same as the addition step, but instead of using add, we use sub to subtract the license quantity.
Step 5: Update the Subscription Quantity in Cloud-IQ
The final step is to update the subscription. Add a new HTTP request with the same URI as the “get subscription” request. The only difference is that this time, you’ll use the Data Operations we created to change the quantity. The easiest way to do this is to copy the “get subscription” step, since most of the details will be the same.
- Change the method to PUT
- Add the header Content-Type: application/json
- Change the Body by selecting dynamic content and then choosing the AddOneLicense outputs
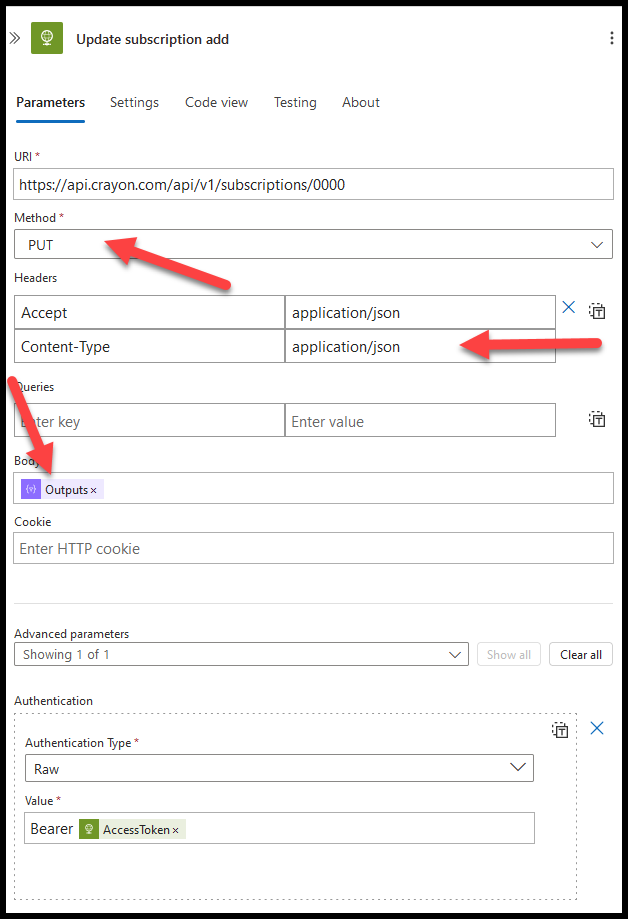
Your new flow should look something like this
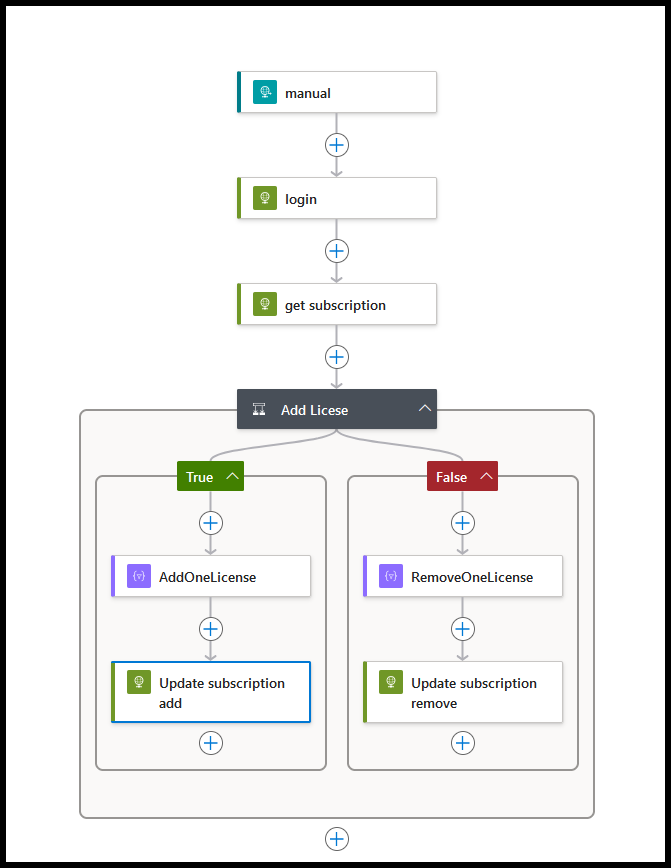
And that’s it! We’ve now created a flow where, when a user is assigned to an Access Package, they receive a license, and the license is automatically purchased directly from the vendor. Similarly, when a user is removed from the Access Package, a license is sold back to the vendor, ensuring that the company always has the correct number of licenses. This process also leverages Azure’s full potential for logging and tracking.
Discover more from Agder in the cloud
Subscribe to get the latest posts sent to your email.
