Tired of the hassle of manually buying licenses? Constantly worrying if you’ve bought too many, too few, or even the wrong ones? Let me show you how to automate the process and make things much simpler!
Managing licenses by hand can be slow, confusing, and full of mistakes. It wastes time, costs more money, and becomes even harder when your license needs keep changing. By automating license purchases and assignments, you can avoid these headaches. Automation ensures your team always has the right licenses at the right time, even outside work hours.
In this post, we’ll look at how CloudIQ and Entra ID Governance can turn license management into a smooth, cost-saving process.
Why Automate License Management?
Managing licenses manually is slow, expensive, and prone to mistakes. Automation solves this by assigning licenses instantly—even outside office hours—so users can start working from Day 1. This removes the need for keeping extra licenses just in case. It also saves time for admins, letting them focus on more important tasks, and makes it easier to buy licenses from different vendors in one place. Using CloudIQ and Entra ID Governance helps organizations manage licenses securely, efficiently, and at a lower cost.
How Microsoft Entra Governance and Cloud-IQ Work Together
Microsoft Entra Governance and Cloud-IQ complement each other by creating a seamless and automated license management process. Here’s how they work together:
- Microsoft Entra Governance: Manages the identity lifecycle, making sure users get the right roles and permissions based on their status (e.g., when they join or leave the company, or change roles). Entra ID’s Lifecycle flows automatically assign licenses based on defined scopes. This keeps licenses matched with the user’s role and needs, without needing manual changes.
- Cloud-IQ: Serves as the central system for managing license purchases from different vendors. When Entra ID detects that a new license is needed (for example, when a new user joins or their role changes), Cloud-IQ automatically buys and sets up the license, so admins don’t have to manually request or track them.
Together, they provide a unified approach to license management, automating both the assignment and procurement process. This integration ensures that licenses are always up to date, available when needed, and purchased at the right time, reducing costs and administrative overhead while improving security and compliance.
Learn How to Buy Licenses with PowerShell
Get a Cloud-IQ Account with API Access
Begin by requesting a user account from CloudIQ, or if you already have an administrator account, create a separate account for this purpose.
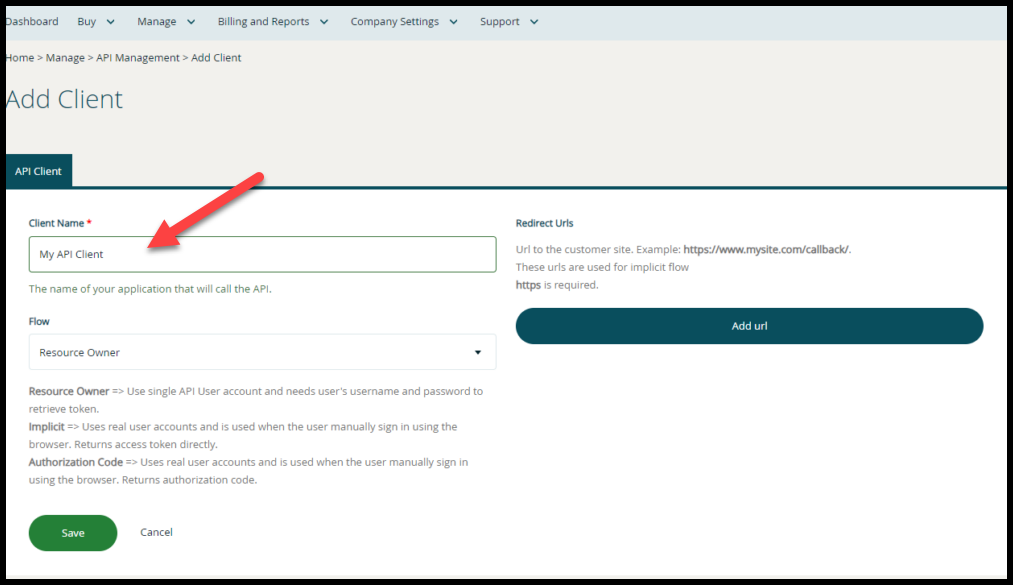
Next, sign in to your Cloud-IQ instance using an administrator account and go to Manage -> API Management. Add a new client, assign it a name, and choose the “Resource Owner” flow. Click Save, then create a new secret. Make sure to save this secret, as you’ll need it later for authentication.

This app will authenticate itself first. Once that’s complete, it will fetch a token on behalf of the user account, which will act as a delegate to perform tasks through the API.
Start with converting the clientID and Secret as secure strings
[securestring]$secStringPassword = ConvertTo-SecureString '<CloudIQ Client Secret>' -AsPlainText -Force
[pscredential]$credObject = New-Object System.Management.Automation.PSCredential ('<cloudIQ clientID', $secStringPassword)
As the next step, you’ll need to create a request body containing all the necessary information. This includes the username, password, grant_type, and scope for the user account. The body should look like this:
$body=@{
  username ="user@example.com",
  password= "yourPasswordHere",
  grant_type ="password",
  scope = "CustomerApi"
}
Now that we’ve set up the request body, it’s time to use Invoke-RestMethod in PowerShell to connect and authenticate.
$tokenrespons =Invoke-RestMethod -Method POST -Uri "https://api.crayon.com/api/v1/connect/token/" -ContentType application/x-www-form-urlencoded -Authentication Basic -Credential $credObject -body $body -Headers @{Accept = 'application/json' }
In PowerShell, when dealing with credentials, the method expects a PSCredential object. This means you need to convert the access token to a secure string before it can be used, which is how OAUTH is meant to authenticate.
[securestring]$token = ConvertTo-SecureString $tokenrespons.AccessToken -AsPlainText -Force
We Will Show You How to Update a Microsoft 365 E3 License
Now that we’ve successfully connected to the Cloud-IQ API, it’s time to retrieve the subscription you want to update.
To update a subscription, you’ll need its ID from Cloud-IQ. You can retrieve this ID in two ways: either by making an API call to /subscriptions or, more easily, by checking the URL when viewing the subscription in the Cloud-IQ portal. .
https://cloudiq.crayon.com/subscriptions/edit/<subscriptionID>/?organizationId=<organizationID>You’ll also need the CustomerTenant value, as a single company can manage multiple tenants. The easiest way to find this is by checking the URL while browsing the cusomerTenant in the Cloud-IQ portal.
https://cloudiq.crayon.com/customertenants/<tenantID>To update a subscription, the first step is to retrieve the full subscription object. This ensures you have all the requirements for making an update.
$sub = Invoke-RestMethod -Method Get -Uri "https://api.crayon.com/api/v1/subscriptions/<subscriptionID>" -Authentication Bearer -Token $token The only field we really need from the subscription object is the quantity, which represents the current number of licenses. To buy or reduce licenses, simply modify this value and send the updated object back to the API.
$sub.Quantity = $sub.Quantity + 1Since Invoke-RestMethod doesn’t handle JSON formatting gracefully in some cases,we need to convert the variable to JSON ourselves.
$body = ConvertTo-Json $subNow that we have the updated quantity field, we’re ready to update the number of licenses in Cloud-IQ. To do this, send the modified subscription object with the new amount back to the API.
Invoke-RestMethod -method PUT -uri "https://api.crayon.com/api/v1/subscriptions/$id/" -body $body -Authentication Bearer -Token $token -ContentType application/jsonWe have now successfully added an extra license to the selected subscription!
The complete script now looks like this:
#convert clientID credentials to securestring
[securestring]$secStringPassword = ConvertTo-SecureString '<CloudIQ Client Secret>' -AsPlainText -Force
[pscredential]$credObject = New-Object System.Management.Automation.PSCredential ('<cloudIQ clientID', $secStringPassword)

#create a body
$body=@{
  username ="user@example.com",
  password= "yourPasswordHere",
  grant_type ="password",
  scope = "CustomerApi"
}

#Connect to CloudIQ to retrive tokenrespons
$tokenrespons =Invoke-RestMethod -Method POST -Uri "https://api.crayon.com/api/v1/connect/token/" -ContentType application/x-www-form-urlencoded -Authentication Basic -Credential $credObject -body $body -Headers @{Accept = 'application/json' }

#convert token to PScredential
[securestring]$token = ConvertTo-SecureString $tokenrespons.AccessToken -AsPlainText -Force

#Get Selected subscription
$sub =     Invoke-RestMethod -Method Get -Uri "https://api.crayon.com/api/v1/subscriptions/<subscriptionID>" -Authentication Bearer -Token $token

#Add 1 more license to the subscription
$sub.Quantity = $sub.Quantity + 1

#convert $sub to json
$body = ConvertTo-Json $sub

#update subscription with new Quantity
Invoke-RestMethod -method PUT -uri "https://api.crayon.com/api/v1/subscriptions/$id/" -body $body -Authentication Bearer -Token $token -ContentType application/json
Now that we’ve learned how to manage license updates with PowerShell, we will in the next post take it a step further and integrate this process with Entra ID Governance.
Discover more from Agder in the cloud
Subscribe to get the latest posts sent to your email.


