
Background
I was recently tasked with helping a customer implement a Tunnel Gateway server to use with their Intune installation. This is a service which is used for tunneling traffic from endpoints (phones, iPads, laptops) into a perimeter network. A typical use case would be when you have Intune managed devices that needs to reach an on-premises service. As well as the gateway, the customer wanted automatic certificate renewal, as the expiry times for new certificates keep getting shorter, which in turn adds work if the renewal has to be done manually.
Prerequisites
Compute
The service runs as a container on a Linux based virtual machine. Microsoft supports a limited set of Linux distributions, see this list. This guide will use a Docker based installation.
The virtual machine should also be setup with two networking cards (it can use a single NIC as well, but I will not recommend it here). The first card should be put in a network that can be reached from the internet (typically a DMZ of some sort). This card will also be used for communication with Microsoft’s cloud services. The second card shold be placed in a network which is allowed to reach the services that you need your endpoints to communicate with, but is not reachable from the internet. This network should preferably be locked down to only allow the traffic that should be tunneled. Management traffic of the server should also go through this interface.
Microsoft has the following guidance on how to size your VM:
| # Devices | # CPUs | Memory GB | # Servers | # Sites | Disk Space GB |
|---|---|---|---|---|---|
| 1,000 | 4 | 4 | 1 | 1 | 30 |
| 2,000 | 4 | 4 | 1 | 1 | 30 |
| 5,000 | 8 | 8 | 2 | 1 | 30 |
| 10,000 | 8 | 8 | 3 | 1 | 30 |
| 20,000 | 8 | 8 | 4 | 1 | 30 |
| 40,000 | 8 | 8 | 8 | 1 | 30 |
Networking
If you have any firewalls in place between your VM and the networks you need to reach (you should!), you need to poke some holes in it. The tunnel server needs the following ports opened:
Inbound (Internet exposed interface):
- tcp/443, udp/443
Outbound (Internet exposed interface):
- tcp/443
Inbound (Internal interface):
- tcp/22
Outbound (Internal interface):
- tcp/443 to your internal services
If you want more granular control over your firewall ACL’s (typically if you use application and/or domain filtering on a NGFW), you can follow Microsoft’s guidance here.
IPAM
You should also allocate two networks. One that you will use internally on your server for your Docker installation. The Tunnel Gateway uses this network to allocate containerized network interfaces to each tunnel it creates. The second will be used by the endpoints themselves. It is important that these networks do not overlap with any of the networks you need to reach from your server or endpoints.
Other
Your domain registrar needs to be able to do dns-01 ACME challenges. This varies based on which registrar you are using for the domain on which you wish to have the certificate issued. If you are unsure, you can search Google and see if you can find one for your registrar. The official documentation also maintains a list of some of the most popular plugins. You can find it here. If you can’t do dns-01 challenges, but instead depend on http-01, you can run the renewal process on a different server, and copy the cert over. This is out of scope for this article though.
Initial server setup
I’m assuming in this article that you have already installed Linux on your VM, and that you have root access either through SSH or console.
Networking setup
You should have two network interfaces on your server. To verify, run ip link. The result should look something similar to this:
bitwise@tunnelserver:~$ ip link
1: lo: <LOOPBACK,UP,LOWER_UP> mtu 65536 qdisc noqueue state UNKNOWN mode DEFAULT group default qlen 1000
link/loopback 00:00:00:00:00:00 brd 00:00:00:00:00:00
2: ens192: <BROADCAST,MULTICAST,UP,LOWER_UP> mtu 1500 qdisc mq state UP mode DEFAULT group default qlen 1000
link/ether 00:50:5f:92:34:71 brd ff:ff:ff:ff:ff:ff
altname enp11s0
3: ens224: <BROADCAST,MULTICAST,UP,LOWER_UP> mtu 1500 qdisc mq state UP mode DEFAULT group default qlen 1000
link/ether 00:50:5f:92:ac:6e brd ff:ff:ff:ff:ff:ff
altname enp19s0
Here we see that there are two network interfaces present on the server. Determine which interface is the internal one, and which is the external one before proceeding. In our case, ens192 is the external one, and ens224 is the internal one.
Next, we need to configure routing on the server. This needs to be done in order to send internal traffic on the correct interface, while all other traffic gets sent out through the external one. There are many ways to do this depending on which distribution you are using, but in my case, we are using a modern Debian-based one, so we’ll use systemd-networkd.
First, we configure the external interface. Create a file with with a sensible name in /etc/systemd/network with your favorite editor. Example: sudo editor /etc/systemd/network/20-ens192.network. Fill in your configuration with sane values:
[Match]
Name=<interface name, in our example "ens192">

[Network]
Address=<external IP address>/<netmask>
Gateway=<IP address of network gateway>
DNS=<DNS server 1>
DNS=<DNS server 2>
Next, we configure our internal interface. Use the same procedure as you did with the external interface (sudo editor /etc/systemd/network/10-ens224.network):
[Match]
Name=<interface name, in our example "ens224">

[Network]
Address=<internal IP address>/<netmask>
DNS=<DNS server 1>
DNS=<DNS server 2>

[Route]
Gateway=<IP address of network gateway>
Destination=<internal network that should be reachable from the gateway>/<netmask>
Note that you should not configure a gateway in the [Network] block, but instead configure it in each [Route] block. This way we keep the default route on the external interface, and only route the networks we specify across this interface. Add as many [Route] blocks as needed to cover your internal networks.
Now we need to activate the configuration. Make sure there is no active configuration in /etc/network/interfaces. This can be done by editing the file, and commenting out everything except the the following two lines:
auto lo
iface lo inet loopback
This ensures we do not have any conflicting configuration between the old deprecated configuration tools, and the new shiny systemd-networkd. Next, activate the systemd-networkd daemon by running the following two commands:
systemctl enable systemd-networkd

systemctl daemon-reload
Next, enable IP forwarding by uncommenting the following line in /etc/sysctl.conf:
net.ipv4.ip_forward=1
The last thing we need to do, is making sure that the tun kernel module is loaded automatically on boot. This is done by running the following command: echo tun > /etc/modules-load.d/mstunnel_tun.conf
After running these commands, restart your server to make sure the configuration survives a reboot. When the system comes back up, run networkctl, ip addr, sysctl net.ipv4.ip_forward and lsmod | grep tun to make sure everything looks right.
Next, we need to configure Let’s Encrypt.
Certificate setup
Certbot is the de facto standard for managing Let’s Encrypt certificates on Linux. Our setup is no exception, so the next thing on our agenda, is installing it. As we’re still on our Debian-based system, we’ll use apt. Install certbot with the following command:
apt install certbot
After certbot is installed, you need to setup your DNS plugin. After you’ve installed and configured your DNS plugin, you can run the following command:
certbot certonly --key-type rsa --preferred-chain "ISRG Root X1" -d <domain you wish the certificate to be issued to> <DNS plugins parameters>
I’m using the certbot-dns-domeneshop plugin, which requires some additional parameters. The above command therefore might look something like this:
certbot certonly --key-type rsa --preferred-chain "ISRG Root X1" -d tunnel.agderinthe.cloud --authenticator dns-domeneshop --dns-domeneshop-credentials /etc/letsencrypt/credentials.ini --dns-domeneshop-propagation-seconds 120
The --key-type rsa and --preferred-chain "ISRG Root X1" are important, as the Tunnel Gateway daemon wont accept the certificate otherwise.
If the certificate issuing process is successful, certbot will store your certificates under /etc/letsencrypt/live/<domain name>/(fullchain|privkey).pem. We will not do anything with them yet. However, we should now setup our post-renewal script. This script copies any renewed certificates to a folder under the Tunnel Gateway folder structure, and asks it to import it.
Create a file under /etc/letsencrypt/renwal-hooks/deploy. The file name does not matter, but the file needs to be executable. Make it executable by running the command chmod +x <file name>. The script should contain the following:
#! /bin/bash

CERTSOURCEFILE="/etc/letsencrypt/live/<domain name>/fullchain.pem"
PRIVKEYSOURCEFILE="/etc/letsencrypt/live/<domain name>/privkey.pem"

CERTDESTFILE="/etc/mstunnel/certs/site.crt"
PRIVKEYDESTFILE="/etc/mstunnel/private/site.key"

cp $CERTSOURCEFILE $CERTDESTFILE
cp $PRIVKEYSOURCEFILE $PRIVKEYDESTFILE

chmod 0600 $PRIVKEYDESTFILE

/usr/sbin/mst-cli import_cert
The certificate setup is now complete. We can now proceed to the final step, actually installing the Tunnel Gateway.
Tunnel Gateway setup
Microsoft Tunnel Gateway requires that Docker is installed. We will leave the part of installing Docker as an exercise for the reader, by sending you over to Docker’s official documentation. Come back here when you are done 😉
When you’re done installing Docker, you need to configure the default container network. This is the network we mentioned in the prerequisites section, and is done by editing the file called /etc/docker/daemon.json. The file should look like this when you’re done:
{
"bip": "<IP address to Docker's gateway address>/<netmask>"
}
When you’re done, do a reboot to make sure everything still survives a reboot. When the server is back up, run ip addr to check that the docker0 interface has the IP address you configured in daemon.json:
4: docker0: <BROADCAST,MULTICAST,UP,LOWER_UP> mtu 1500 qdisc noqueue state UP group default
link/ether 02:42:d9:71:99:09 brd ff:ff:ff:ff:ff:ff
inet 192.168.248.1/21 brd 192.168.255.255 scope global docker0
valid_lft forever preferred_lft forever
inet6 fe80::42:d9ff:fe71:9909/64 scope link
valid_lft forever preferred_lft forever
Next, we’ll be heading into the Intune administration portal in Microsoft 365.
Create a Server configuration
A server configuration is a common set of configuration options that can be applied to sites. To create a server configuration, from the Intune admin portal, go to Tenant administration > Microsoft Tunnel Gateway > Server configurations > Create new. Here you’ll need to fill in some fields. Most are self explanatory, but here is a description of some of the fields that are relevant to this guide:
IP address range: Endpoint IP addresses are allocated from this range. This is the other network referred to in the prerequisites chapter. As mentioned, make sure this does not conflict with any networks that you need to reach from the endpoint.
DNS server: These are the DNS servers the endpoints will use. Make sure these are set correctly with the DNS suffix search in order to properly resolve internal resources.
Split tunneling rules: Make sure the internal networks that you wish to reach from your endpoints are defined here. A default route is not supported.
Next, we’ll need to define a Site.
Create a Site configuration
A site is where you define your actual server. To create a site configuration go to the Intune admin portal, then go to Tenant administration > Microsoft Tunnel Gateway > Sites > Create.
More fields will need to be filled – here are a description of the most relevant ones:
Public IP address or FQDN: This is the DNS name for your server. It should match the domain for which your Let’s Encrypt certificate was issued earlier in this guide.
Server configuration: Here you select which server configuration you wish to associate to this particular site.
URL for internal network access check: This is a helpful tool to verify network connectivity from your server further into your internal network. It can be used to detect problems with your internal network.
Automatically upgrade servers at this site: If this is enabled, the Tunnel Gateway will automatically update itself. Consider installing a second Tunnel Gateway and configuring Limit server upgrades to maintenance window if you enable this.
Install the Tunnel Gateway services
To install the Tunnel Gateway, run the following three commands:
wget --output-document=mstunnel-setup https://aka.ms/microsofttunneldownload

sudo chmod +x ./mstunnel-setup

sudo ./mstunnel-setup
The installer will prompt you for various tasks. When the installer asks you for a certificate, you must copy the certificate files issued by Let’s Encrypt to the installation folder of the Tunnel Gateway. This is done by running the following commands:
sudo cp /etc/letsencrypt/live/<your domain>/fullchain.pem /etc/mstunnel/certs/site.crt

sudo cp /etc/letsencrypt/live/<your domain>/privkey.pem /etc/mstunnel/private/site.key
After the installer has registered the certificates, it will ask you which Site it should associate with. Select the Site you created earlier in this guide.
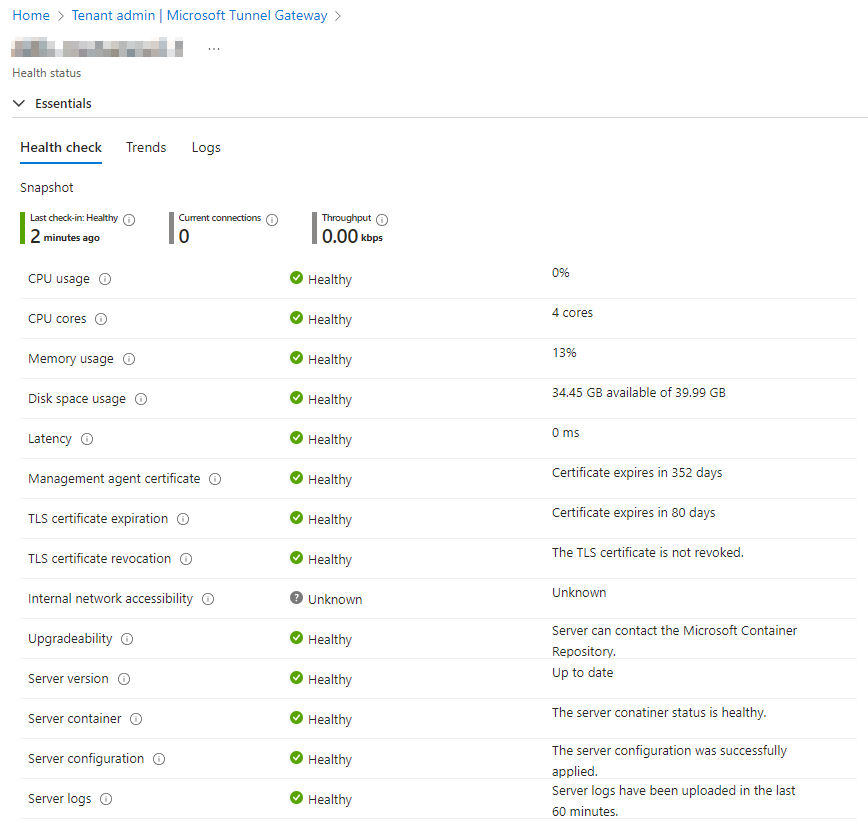
The installer should now complete, and after a while you can see the status of the tunnel in the Intune portal:
You can now start configuring apps that use the Tunnel Gateway!
References
Microsoft Tunnel Gateway official documentation: https://learn.microsoft.com/en-us/mem/intune/protect/microsoft-tunnel-overview
Certbot official documentation: https://eff-certbot.readthedocs.io/en/latest/
Certbot parameter info: https://www.reddit.com/r/Intune/comments/yrp2gd/unable_to_use_letsencrypt_fullchain_for_microsoft/
Author
Discover more from Agder in the cloud
Subscribe to get the latest posts sent to your email.